


desertcart.com : 
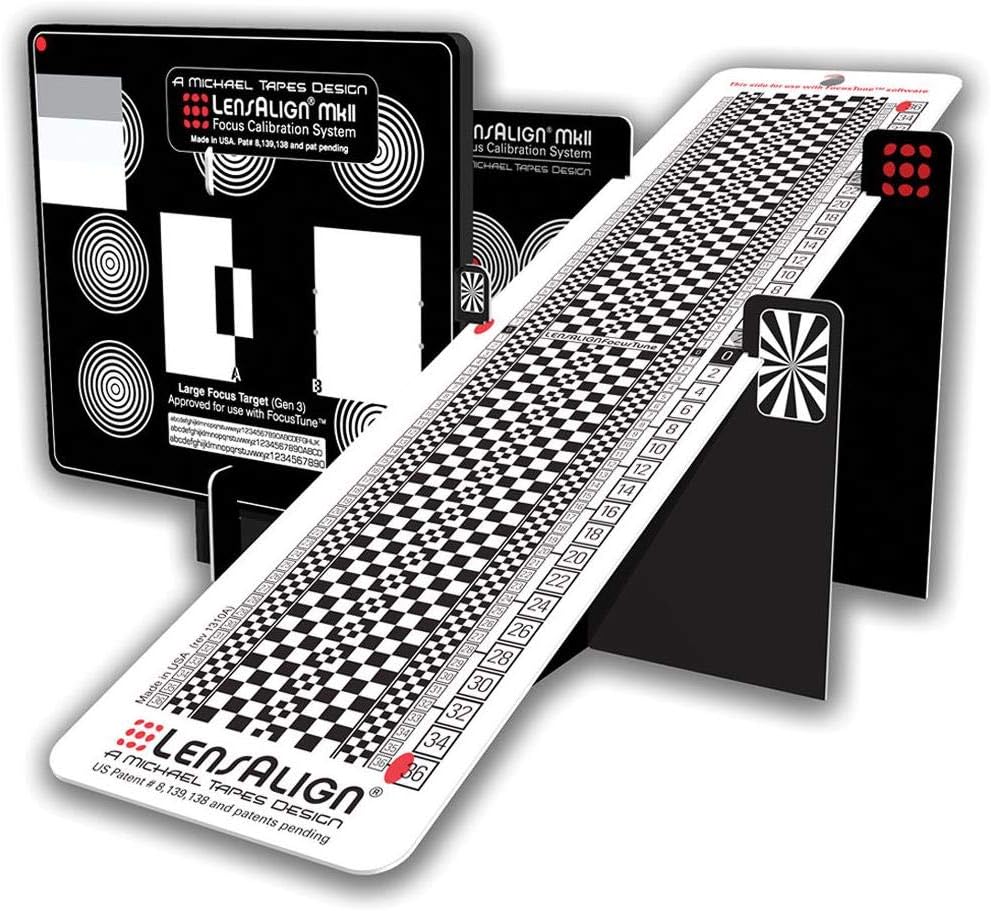
LensAlign MkII Focus Calibration System : Camera Lens Accessories : Electronics Review: Yep, go ahead and buy it. :) - So... here's the deal. I was using another target for auto-focus fine tuning, and had been for a couple of years... but that particular target - while good - wasn't really giving me the kind of results I really wanted. I found myself spending hours on a given lens, taking shots, loading shots, re-taking shots, and so forth. This target - with it's high-quality graphics, contrasts and colors - was giving me much more consistent results. It's a good quality product, and as long as you follow the directions, easy to put together. Pretty much "Insert tab A into slot B", etc. The base on the unit is good, too - nice and stable. But truthfully? I was still tired of taking series upon series of shots, and then blearily eyeballing for front an/or back-focus between adjustments. So I decided to take a chance (after reading reviews on the product) and get the companion software (FocusTune) from Michael Tapes website. $50... not too bad an investment, and again, the reviews were good. Well... I can tell you that the target is excellent, and the target WITH the software is GREAT. I tuned four lenses (A Tamron 70-200 F/2.8, a Nikon 300mm F/4, a Sigma Art 50mm F/1.4 and a Tokina 100mm Macro lens) in four hours flat on my D750. And the tuning I got from the software (with one exception) was absolutely rock-solid and spot-on each time. As to the one time that it wasn't perfect... that was with the 300mm (effective 420mm with my TC-14E III teleconverter) Nikon lens. I strongly suspect that since I didn't have a lens-mount collar for that lens (one is available, I simply don't own one), I was having occasional vibration on the tripod while shooting. If I'd had the collar and shot in quiet shutter (or even MUP) mode, I suspect that the end result would have been like the others - spot on. However, since the software put me in the right area (it recommended +10), it took me a about 15 minutes of "real-world" testing to figure out that +8 was actually the best setting - and now that lens hits with perfect focus on every shot. :) So...I would buy this all over again. There's no big price difference between buying the software AND target or buying them separately, but I recommend that you get both. It's one heckuva time saver. :D Review: Good but better instructions would have helped a lot. - I calibrated several lenses with my D500 and D810 bodies and the LensAlign system seems to work well. I still need to get out and just take some pictures to be absolutely sure, but a preliminary cross check of my results with the AFtune 'On' against AFtune 'Off' definitely shows improvement in point of focus clarity. So it seems mission accomplished. Build quality of the system is fine as far as I am concerned. Very clever design...but it is not the most rugged in construction. However, I'm not sure what other practical alternates there would be (all metal???...I don't think so). I'm sure I will get many years out of it as long as I take reasonable care of it. So, from that standpoint I am happy. As some others have mentioned, I was not happy with the instructions...or lack of instructions more appropriately. Yes, I found the stuff on line and on the LensAlign website and watched it all. It seemed that depending on where I looked, there were different models with different print patterns and I just wasn't sure what I was going to get. But, okay. Other than that, my specific issues are: Sighting ports - there is a 'A', 'B', and 'C' port noted as "default", "close", and "Macro" respectively. Okay, Macro I got...but what focal lengths should the 'A' and 'B' ports be used for? I could find absolutely no direction anywhere and just kind of stumbled my way through it (I was calibrating 50, 85, 70-200 and 200-500mm lenses). After ordering, I saw there was an option for a longer ruler for longer focal lengths. I checked the LensAlign site and all I could get from it was that calibrating my 200-500 at 500mm was "marginal" and the quite expensive long ruler was recommended. What the heck does marginal mean? Well, I know now because I figured out they mean marginal because of the length of the "standard" ruler is maxed out in depth of field with a 500mm lens. But, again, I got it to work but it would have been better if all of this was made a bit clearer. Speaking of rulers, one side (side B) states "This side for special use only". The other side (side A) states "Optimized for Focus Tune Software". I don't have the software and what the heck does "special use" mean??? I used side 'A'...but again, just not at all clear. The distance to use for testing is also not clear. Yes, the site has the distance tool which shows minimum and maximum distances...but, what happens if you bust the minimum distance? What happens if you shoot in between the two? Are you better off shooting at one over the other? Some specific guidance as to what the impact these variables have would have been helpful. The procedure has a lot of different steps to it. It takes time...and gets easier to use as you get used to the process. But, this is not a quick "plug and play" thing...you will have to work at. In the end, the results are worth the effort. For example, I had to really crank in the compensation for my 70-200 lens for my D810 body (+17) but only needed +3 on my D500. I don't know how I would been able to figure this out without a tool like this. So, again, mission accomplished. Better instructions would have made it an easy 4 or 5 star rating.
| Customer Reviews | 3.8 out of 5 stars 73 Reviews |
J**R
Yep, go ahead and buy it. :)
So... here's the deal. I was using another target for auto-focus fine tuning, and had been for a couple of years... but that particular target - while good - wasn't really giving me the kind of results I really wanted. I found myself spending hours on a given lens, taking shots, loading shots, re-taking shots, and so forth. This target - with it's high-quality graphics, contrasts and colors - was giving me much more consistent results. It's a good quality product, and as long as you follow the directions, easy to put together. Pretty much "Insert tab A into slot B", etc. The base on the unit is good, too - nice and stable. But truthfully? I was still tired of taking series upon series of shots, and then blearily eyeballing for front an/or back-focus between adjustments. So I decided to take a chance (after reading reviews on the product) and get the companion software (FocusTune) from Michael Tapes website. $50... not too bad an investment, and again, the reviews were good. Well... I can tell you that the target is excellent, and the target WITH the software is GREAT. I tuned four lenses (A Tamron 70-200 F/2.8, a Nikon 300mm F/4, a Sigma Art 50mm F/1.4 and a Tokina 100mm Macro lens) in four hours flat on my D750. And the tuning I got from the software (with one exception) was absolutely rock-solid and spot-on each time. As to the one time that it wasn't perfect... that was with the 300mm (effective 420mm with my TC-14E III teleconverter) Nikon lens. I strongly suspect that since I didn't have a lens-mount collar for that lens (one is available, I simply don't own one), I was having occasional vibration on the tripod while shooting. If I'd had the collar and shot in quiet shutter (or even MUP) mode, I suspect that the end result would have been like the others - spot on. However, since the software put me in the right area (it recommended +10), it took me a about 15 minutes of "real-world" testing to figure out that +8 was actually the best setting - and now that lens hits with perfect focus on every shot. :) So...I would buy this all over again. There's no big price difference between buying the software AND target or buying them separately, but I recommend that you get both. It's one heckuva time saver. :D
A**R
Good but better instructions would have helped a lot.
I calibrated several lenses with my D500 and D810 bodies and the LensAlign system seems to work well. I still need to get out and just take some pictures to be absolutely sure, but a preliminary cross check of my results with the AFtune 'On' against AFtune 'Off' definitely shows improvement in point of focus clarity. So it seems mission accomplished. Build quality of the system is fine as far as I am concerned. Very clever design...but it is not the most rugged in construction. However, I'm not sure what other practical alternates there would be (all metal???...I don't think so). I'm sure I will get many years out of it as long as I take reasonable care of it. So, from that standpoint I am happy. As some others have mentioned, I was not happy with the instructions...or lack of instructions more appropriately. Yes, I found the stuff on line and on the LensAlign website and watched it all. It seemed that depending on where I looked, there were different models with different print patterns and I just wasn't sure what I was going to get. But, okay. Other than that, my specific issues are: Sighting ports - there is a 'A', 'B', and 'C' port noted as "default", "close", and "Macro" respectively. Okay, Macro I got...but what focal lengths should the 'A' and 'B' ports be used for? I could find absolutely no direction anywhere and just kind of stumbled my way through it (I was calibrating 50, 85, 70-200 and 200-500mm lenses). After ordering, I saw there was an option for a longer ruler for longer focal lengths. I checked the LensAlign site and all I could get from it was that calibrating my 200-500 at 500mm was "marginal" and the quite expensive long ruler was recommended. What the heck does marginal mean? Well, I know now because I figured out they mean marginal because of the length of the "standard" ruler is maxed out in depth of field with a 500mm lens. But, again, I got it to work but it would have been better if all of this was made a bit clearer. Speaking of rulers, one side (side B) states "This side for special use only". The other side (side A) states "Optimized for Focus Tune Software". I don't have the software and what the heck does "special use" mean??? I used side 'A'...but again, just not at all clear. The distance to use for testing is also not clear. Yes, the site has the distance tool which shows minimum and maximum distances...but, what happens if you bust the minimum distance? What happens if you shoot in between the two? Are you better off shooting at one over the other? Some specific guidance as to what the impact these variables have would have been helpful. The procedure has a lot of different steps to it. It takes time...and gets easier to use as you get used to the process. But, this is not a quick "plug and play" thing...you will have to work at. In the end, the results are worth the effort. For example, I had to really crank in the compensation for my 70-200 lens for my D810 body (+17) but only needed +3 on my D500. I don't know how I would been able to figure this out without a tool like this. So, again, mission accomplished. Better instructions would have made it an easy 4 or 5 star rating.
C**E
Effective tool
The LensAlign Focus Calibration System (FCS) works effectively for digital cameras with microfocus adjustments. What you're not told is that you'll also use 1 or 2 tripods, a computer with web access, a tape measure, and a copy of Photoshop. Use is not complex once you get the hang of it. Unfortunately, you will have to go to Tapes' website and search for usage instructions. There is nothing provided with the product, an inexplicable omission. Even when you get to Tapes' website, you'll have to search around a bit to find the procedural instructions. His "knowledge base" under the support tab has 28 articles, which is a bit confusing. The one you want is [...] In a nutshell, here's how the thing works: (1) Assemble the FCS. The FCS arrives in knockdown form, with stiff plastic pieces. You'll be able to set it up in a couple of minutes, using the precise instructions provided. They're of the insert-tab-A-in-slot-B type and well illustrated. You'll be wondering why, given that it consists of a few stiff plastic pieces, it cost as much as it did. The key features are a focus target with a hole in it that shows a red dot behind when things are lined up, and a tilted ruler on the side of the focus target that has calibration numbers extending forward and backward from the plane of the main focus target. The red dot and rigid structure after assembly ensure the ruler is perfectly square to what your camera will be focusing on. (2) Figure out how far your lens needs to be from the FCS to run the test. This varies by lens focal length, aperture, and camera sensor size. You'll have to consult the website to get the formula, but once you're there Tapes provides a handy calculator. For example, with a full-frame camera like a Canon 5DM2 using a 200mm f/2.8 lens, this is 16.4 ft to give a depth of field of +/- 2 inches. A 50mm f/1.2 lens on the same camera should be at 4.1 ft, giving a +/- 0.8 inch depth of field. Be aware that very long or slow lenses may need Tapes' extra-long ruler as an accessory purchase for the FCS so that their full depth of field falls on the ruler. The calculator advises you when this is necessary. It's not specified whether the distance is measured from the camera focal plane or the front of the lens but I'm thinking focal plane. (3) Get your camera perfectly aligned physically with the front of the FCS, at the distance calculated in step 2 The little red dot on the back wall of the FCS must be perfectly centered and visible through the hole in the FCS front wall. This involved lots of tiny re-positionings of your camera and the FCS and repeated test shots. Getting your camera and lens(es) perfectly aligned to shoot the test photos takes a few minutes. Your camera can't be too high, too low, angled to the left or the right--it must be absolutely square to the front of the focus target. One tripod is a necessity and a second (I used a tabletop Gorilla-style tripod here) is helpful. If you're an owner of a camera that offers focus calibration micro-adjustment and are considering this product, however, you almost certainly already own a good tripod. I found using live view and magnification to be quite helpful. I also wrote the various lens, aperture and distance settings on post-it notes so they were in view in the test photographs. (4) Let your camera autofocus on the main target of the FCS, with the ruler also visible on the side. Take your test shot. Using a time-delayed exposure or shutter release cable to minimize motion is recommended. (5) Examine the test shot to see whether the focus on the ruler is properly centered on the 0 and not centered behind or in front of the plane the autofocus targeted. If it is, you'll need to adjust the microfocus in your camera per the manufacturer's instructions. Tapes doesn't provide much guidance on how much to adjust, but this varies by camera and test result. Tapes suggests using the "emboss" action in Photoshop to make the results clearer (another gotcha if you don't have Photoshop handy) but I didn't find this necessary. Figure 30 minutes to do your first lens, 10 minutes to do each subsequent lens. You can disassemble the FCS for flat storage when you're done. If you don't have a microfocus adjustment in your camera, the FCS might be of some small use to you. It could help you identify whether a particular lens is back-focusing and needs to be sent for calibration, for example. You could also learn whether you need to remember when using that lens to focus a bit in front or behind a future subject. Clearly, though, the FCS is of greatest use if your camera permits this kind of microfocus adjustment for individual lenses. Minus 1 star for lack of usage manual (inexcusable in a product in this price range). I'd take off another 1/2 star if I could for the high price for the few die-cut pieces of plastic, but the thing does work well. I'd like it better if it were half the price. I didn't feel, when holding it, that it should cost so much. Be aware that you may need to make the accessory purchase of the extra long ruler if you're calibrating very long or slow lenses. Check out the website to see if you'll need that for your camera/lens combo before you make the purchase.
R**C
Good tool but...
Note: See updates at the bottom of my review. This is good tool to calibrate your lens but as far as instruction and support goes it's lacking. The only supplied documentation is a sheet on how to assemble the device but absolutely nothing on how to use it. (I purchased LensAlign MkII version). On the package there is a reference to the website. If you spend enough time here, you will eventually find 3 videos and some PDF documents to assist with the calibration process. The layout and structure of the website is a lacking in many ways: 1. There is no logical structure to the content. Be prepared to spend a little time and become a little frustrated. 2. Once you finally find some content you can't bookmark it because the URL is the same as the home page (very odd) 3. If you find the page of PDF documents, there is a chance the illustrations and information in those docs don't match your specific version. Plus some of the instructions are weak and is lacking information. 4. Beware: On some web pages, you may experience that you can't scroll all the way down on a page preventing you from accessing all the content. The vertical scroll bar is maxed out. This was a problem on Firefox v11 but wasn't as bad on IE v9. Now if adequate instruction was included in the package, the above wouldn't even be issues. Once you educate yourself from Michael's videos and PDFs and watch some 3rd party You-Tube videos you should be able to come up with a process to successfully calibrate your lens to a body. Keep in mind this will take some figuring out on your own and a little web research. For the price of this tool, its not asking too much for adequate instruction. Updated: 4/29/12): I did find that using the procedure "LensAlign User Guide" (although not written for my mk II version) was helpful and adequate. The problem is you might have a hard time finding the PDF on his website. As of today, select the "Support" button at the top, "Knowledge Base" link in the lower right, and "Documentation, Videos, Distance Tool" link in the lower left. Michael, you have a very good product but is severely lacking instruction. Please include a CD with videos and accurate PDFs and provide downloads for us existing users. Thank you. I would like to revise this review once there is adequate instruction. Updated #2: 5/26/12): I have encountered a new problem and have become more frustrated with this product. I wish I would not have purchased this and have down graded my rating to two stars. I had the target setup for a few weeks while I was going through all my lens. The target was in a stationary position and never move. When I went to move the target from the tripod, I noticed the ruler piece had sagged considerably. Well this makes all my testing invalid. I do not know when it sagged and which lens tests were affected. According to Michael's website, it is not recommended to disassemble the target (I assume because it's so fragile and may break), but it is suggested to remove the ruler only for storage. The problem is, if you leave the ruler on the target it will sag to the point where the target is useless. If you remove it, there is a good chance you will break it. I struggled to remove it but I'm not sure how many times I can do this with out breaking it. The pro version which cost about $100.00 more than the Mk II version, has a metal ruler which is removable. Time to find a new tool, this was a waste of my money and time.
I**O
Way way too expensive and virtually unusable
I don't know why this product gets such rave reviews. It is way overpriced and the chart is really hard to read. The concept is great which is why I bought it. Once I got it though it was all downhill. First the alignment system. This is the #1 reason I bought it. If you aren't aligned (so they say) then you won't get good results. The alignment system is a complete joke! They give you 3 itty bitty holes and you have to look through them to see a hole in the back. Holding it in your hand it's relatively easy to do. Put it out 2 feet or worse and good luck! The only way you can get it to work is to shine a light through the back hole. That means I need a tripod for the LensAlign, a tripod for my camera and someway to have a light to shine through the back hole that is 5 feet off the ground. So you do the best you can to get it aligned and then we get to the actual shooting. The ruler is NOT the one you see on their official page or all but the first picture out here. Instead of giant numbers you get these microscopic numbers. For a 70mm lens they want you to be a minimum of 5.7 feet away. The first picture I've attached is at 3 feet. 3 feet is where Tamron want's you to be for their Tap In Console. The second picture is the 100% crop. Now that's not too bad if that's where you were supposed to be. I'd certainly want the large numbers shown on the Product illustrations. Now imagine being twice as far away. Picture 3 and 4 is the 3 feet distance using a 35mm lens which is the proper distance. You can read it but it's getting to be pretty hard to discern real good back/front focus. Now that's the minimum distance. How about a 24mm lens at 3 feet? That's picture 5. The best I can do is to get kind of close. If this was a $20 item then I'm all in. It's a small piece of cardboard and they came up with a neat way to give you the angle but the alignment is useless and it's $85! Before I got this I used AA batteries that were staggered and you know what? The AF Tune number I got was pretty darn close if not exactly what I got off the LensAlign. I don't want to use the batteries though since it's hard to be repeatable and it's certainly not 100% precise so I'll be looking for another chart. I absolutely didn't care for this product and would certainly not recommend.
S**E
Works exactly as expected
Purchased this last week from Amazon. Installation went smoothly, thanks to the included instructions. Product is surprisingly well made, considering that it snaps together and is the cheaper alternative to the pro solution. Best of all ... it works exactly as claimed. I'm using a Nikon D300 with a variety of professional and non-professional lenses, and the MKII was a huge help in getting them all calibrated properly. Finally. I chose between the LensAlign MKII and the DataColor Spyder product ... and chose the Lensalign MKII for two reasons: 1. I really believe that you have to have the front and back sites to be able to know that your camera is truly parallel/lined up to the target/ruler for the system to give meaningful/accurate calibration information. Only the LensAlign has this feature. 2. I watched (from the sidelines) an exchange play out on the Luminous Landscape forums between Micheal Tapes (creator of the LensAlign) and an individual with DataColor (makers of the Spyder). Spyder incorrectly claims, in its marketing materials, that they were the first to offer this type of solution ... while the product appears to have taken the LensAlign theory (minus the front and rear targets) and package it up. Throughout the exchange, I was impressed by Michael's professionalism. I know if I thought someone had copied an idea of my own, was making a buck off of it, and then was claiming to be first to market ... well, I wouldn't be nearly as professional as Michael was. That's the kind of individual/company I prefer to spend my money with.
M**Y
Very Useful Product
I am a serious photographer more interested in making great images than being a techie-type person. That said, I am very close to my equipment. I have the good fortune to have the best of both Canon and Nikon cameras and lenses. For example, have the D4, D800, D700, and a D7000 in the Nikon category. 5D Mark III and a T3i Rebel in the Canon camp. Lenses are those on everyone's wish list and I won't list them all here. I stay on top of various photo mags and blogs, reviewers, and commentators as I always learn something. So, I have seen what seems to me to be an increasing number of complaints about "back-focusing, front-focusing" and other lens related issues, even among the best glass made by Nikon and Canon. Just to be on the safe side, even though I haven't had any auto focusing concerns to date, I bought the Lens Align and spent a full day testing every camera and lens combination that I own. The results are very straightforward--not one lens/camera combination had anything but perfect focus performance. End of story for me. On the Lens Align product--easy to assemble. Then what? Had to go to the internet, YouTube, and other searches to get instructions on how to use the darn thing properly. Once that was sorted out, I was to put it mildly very impressed with how useful the product is. A really, really useful product. There are criticisms that it is overpriced, flimsy, not worth the money, yada, yada, yada. Let me say this--it is the CHEAPEST possible way to diagnose your camera/lens combinations to either prove or eliminate the potential autofocusing problems that are, in my estimation, significantly overstated. As good a photographer as I am after forty years of practice, I will tell you that not every shot I make is perfectly in focus--I move, the subject moves, the wind blows, I ham hand the shutter button--I could go on. Those are not autofocusing problems--they are human error. There is a lot of human error in photography. To eliminate it in my studio, I rarely shoot free-hand--the tripod is my friend. With a tripod, my keeper rate is three times my freehand rate. So, back to the Lens Align--the manufacturer should, without question, do a video on properly using this tool. I agree that what you are buying is a bit overpriced but the peace of mind that the product delivers (either things are good or not and, if not, you can microadjust or send in for calibration)is worth every penny. If you want inexpensive and useful tools, don't get involved in photography!
J**F
Seems to work, but could be better
I decided to order the MkII Focus Calibration System to hopefully help me solve some focus issues I have been having with my Canon system. A few thoughts on the MkII: 1. It does not ship with any usage instructions. The only instructions it comes with are for assembling the device. Instructions for use can be found on the LensAlign website, but given the price, a simple printout of the basic instructions would be appreciated. 2. The device is small, much smaller than I had anticipated, which makes it small in the frame. I would think that making the focus target larger would yield more consistent results. I purchased the MkII primarily to help calibrate my 400mm f/2.8 lens on both of my camera bodies. Given that the instructions from the website recommend the device be places at least 25x the focal length of the lens to calibrate, that puts the device quite a distance (minimum 35 or so feet) away, which makes it quite small in the frame. I had trouble getting repeatable results as the autofocus would sometimes focus on the front edge of the ruler rather than the focus target, even though the selected focus point in the camera was centered on the focus target. A larger focus target would probably help solve that type of issue. 3. The device is a very good design. I hadn't considered the need to align the planes of the target and the camera sensor during earlier focus adjustment attempts, and this devices does that rather cleverly. It may take a bit of time to get things aligned, but it works quite well. 4. In the end, the device did, I believe, help me isolate and address some subtle focus issues in my system, but not without some trouble with the longer lens. A more substantial focus target seems like it would help the MkII give more consistent results. Documentation on either Amazon or the LensAlign website doesn't mention inability to use the MkII with long lenses.
Trustpilot
2 weeks ago
1 week ago