

🔥 Stay cool, stay ahead — build your powerhouse with Versa H21! 🖤
The Thermaltake Versa H21 is a sleek, black SPCC ATX Mid Tower chassis designed for gamers and PC builders seeking efficient airflow and easy customization. Featuring perforated mesh panels, tool-free installation, and front USB 3.0/2.0 ports, it supports a wide range of motherboards and long GPUs while optimizing cooling with pre-installed fans and elevated foot-stands. This budget-friendly case balances functionality and expandability, making it a top choice for professional-grade builds.


| ASIN | B00J0NZ3Q4 |
| Antenna Location | Gaming |
| Best Sellers Rank | #49 in Computer Cases |
| Brand | Thermaltake |
| Case Type | Mid Tower |
| Color | Black |
| Compatible Devices | [A wide range of computer components and peripherals compatible with Mini ITX, Micro ATX, and ATX motherboards, and expansion standards] |
| Cooling Method | Air |
| Customer Reviews | 4.3 out of 5 stars 717 Reviews |
| Enclosure Material | secc |
| Fan Size | 120 Millimeters |
| Global Trade Identification Number | 00841163054246 |
| Hard Disk Form Factor | 2.5 Inches |
| Internal Bays Quantity | 6 |
| Item Dimensions D x W x H | 18.9"D x 8.23"W x 16.89"H |
| Item Weight | 9.3 Pounds |
| Manufacturer | Thermaltake USA Direct |
| Material | secc |
| Model Name | Versa H21 |
| Motherboard Compatability | ATX |
| Number of Fans | 1 |
| Other Special Features of the Product | Not_Performance_Used |
| Power Supply Mounting Type | Rear Mount |
| Recommended Uses For Product | Gaming |
| Supported Motherboard | ATX |
| Total Expansion Slots Quantity | 7 |
| Total USB 2.0 Ports | 1 |
| Total USB 3.0 Ports | 1 |
| Total Usb Ports | 2 |
| UPC | 350584834813 798813001504 809185333428 841163054246 809385182369 012304358152 863121544286 806293514329 803982760661 513560266910 807034591845 898029635965 846764214570 |
| Unit Count | 1.0 Count |
| Warranty Description | 3 years |
A**R
Excellent Budget Case
Pros: By far the best budget case I've ever tried. Case layout is well thought out, all the features work (in the past budget cases would have features that looked correct but didn't function, all the features on this case are functional), front io panel is simple and useful, there's enough room for cable management in the back. The metal is thin but strong enough to do the job. The drive bays are easy to use and work great. Cons: The front cover is difficult to take off which makes installing/cleaning front fans difficult, the rear expansion slot covers are difficult to remove, the PSU dust cover is kinda finicky, the included fan is pretty cheap/loud, one of the amazon pictures shows a side window, which this does not have. Overall: Great case for the $$, obviously if you spend more you'll get more. All the essentials are executed correctly on this case, would buy again.
P**R
Excellent case with plenty drive bays
I have built quite a few computers over the years. But I tend to gravitate towards inexpensive models because I have lots of left-over used parts. This case is very easy to work with, which will be configured as a NAS/server. So, room for drive bays is extremely important. Offerings nowadays tend to gear towards gaming with few or even no drive bays. For example, my main computer does not have a single drive bay. The need for a NAS is pretty clear. This case does not really have any fancy features. Fit and finish is fine, but do not buy it for look. Anyone with just a little bit of experience in putting together a computer can complete the installation in about an hour or two. The only item that requires some thinking is routing the wires and cables, but that should not take that much time even if you had to redo some. There is plenty of room inside, so air flow is very decent. I have no idea if you install a big/long video card; I am using it as a headless device, so no need for discrete video card. The only complaint I have is that the case only came with one fan in the back. I would have appreciated if a couple more fans are pre-installed on the top. But that is still only a minor issue. Overall, I am satisfied. Then factored in the cost, I think it is a very deal. Highly recommended.
S**T
The Good, The Bad, The Ugly
The good is pretty generous for such an affordable case. Great ventilation, tons of drive bays, tooless 5.25 bays, power/reset switches nicely placed on the top for easy access. The bad is more annoying than anything else. The board uses standoffs for ATX boards built into the motherboard tray area. If you use a Micro ATX motherboard, you have to use two screw-in standoffs on the side closest to the PSU. Which is fine, however, they use fine thread screws where the native standoffs are course. Really Thermaltake? In my case I started with the fine thread screws first, because I thought the others followed suit. Obviously, I was wrong, and now I have a MB screw in the corner of the I/O ports, CPU power plug that won't tighten, or backout. That will be interesting when I have to remove the board. You can't pull the out of the I/O plate due to the screw, and you can't lift the screw out due to a very tight corner, which is coming in the next section. Now for the ugly... There is almost zero space in the corner side of the CPU for cable management or access to screws, and the CPU power plug, especially if you have a high tower cooling fan like myself. I already told you about the one corner screw, but the one next to the memory is tucked under the latches locking the ram in place. Even without a tower cooling system it is very tedious. The takeaway is that the case is pretty good for the price no doubt. Fantastic cooling, tons of easy to remove drive bays (my personal favorite), and easy access to everything other than devil's corner that I shared with you above. All in all, I recommend it. Just be aware it has some quirks and with that knowledge, you will have a bargain case that does 90% right.
T**W
Great Case
Doesn't break the bank. Up to 3 external bays - cases with those are getting hard to find for a decent price. 2 x 120mm fans snap into the removable front screen behind the front cover. Front cover comes off without any wires attached. Doesn't require any screw in stand-offs, made into the case. Comes with 3 stand-offs in case you have a extra wide motherboard - there are holes for them but it's rare you come across a board that needs them. The other stands are made into the case, but will strip easy if you tend to over tighten mounting screws- but not a big deal. You can always use a differently threaded screw if needed. Can fit 2 120mm fans into the top, but it's tight. Most CPU air coolers fit, as well as most video cards - but a long card might not fit depending on what you have in the external bays. No clear sides or windows if you want a "pretty" hardware installation but great for those that just want a functional case. Might have to get inventive if you want to use water cooling.
B**T
Nice roomy budget case
Happy with this case. Good quality with a nice finish and accurate openings, etc. Connectors labeled nicely. My only negative observation is that the included fan seems a little cheap and is a 3-pin design. Yes it should work on a 4-pin connector but you'll lose some functionality. Otherwise, a great budget case.
D**N
Decent mid tower ATX
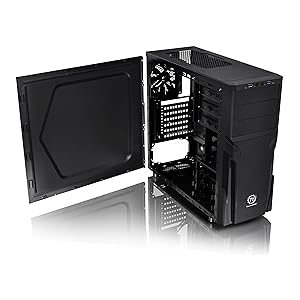
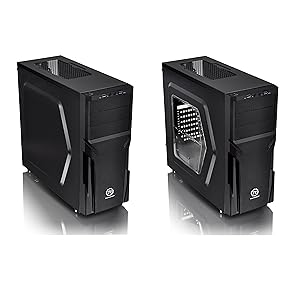
Full disclosure. Let me start off by saying, I don't like Thermaltake products since after the old ~2005 era Toughpower PSUs - you know the HEAVY ones. I had bought a new Smart 750 from Thermaltake (around 2016) who's SATA connectors destroyed three SATA 2.5" SSDs all at once. Thermaltake's response was more or less a shoulder shrug and an offer to replace my power supply (less than 6 months old). It actually fried the chip (burn marks) inside each of the three SSDs and they couldn't care less. So is my review of this case biased? You'll have to decide. ### CONS First, while the case in the pictures looks sturdy, it's only moderately so. As others before me have suggested, the material is thin. The case can twist a bit if forced. 9x standard ATX motherboard mount points are integrated into the fixed motherboard tray - you don't get to choose if you want them or not. Not that big of a deal, but I prefer the choice. 3x additional motherboard stand-off studs are included in my hardware package (for smaller motherboard screw placement) as well as screws to mount your motherboard (I had only 9 screws in my package for that). There were various other screws (probably for drive mounting, but I didn't use them) Let's start at the front. Nothing remarkable - 1x USB 2.0, 1x USB 3.0 (could have added an extra of each of those for better utility use), and mic/speaker ports are provided at the top front. A power and reset switch are positioned on the top of the case (at the front). The front bezel pops off to reveal a dust screen. The dust screen seems to be okay quality. This is where I ran into my first issue. The case specs said it supported 2x 120x120x25 front fans, but I could not find anywhere to screw them in and the instructions didn't say anything about this at all (only mentions the rear fan). I thought maybe I got a manufactured defective one. Then I read someone's review who said front fans didn't need any tools. That's when I went back and looked and I saw (2) 4x fan hold studs and some plastic clip hold-downs integrated on the dust screen that would fit 2x 120mm fans. I installed one Noctua 120mm fan at the bottom of the dust screen. It was a tight fit with the Noctua rubber corner grommets but it fit snuggly enough and I was able to snap the dust screen back into place, so I was satisfied. The case allows for easy routing of the fan cable through (behind) the hard drive cage. Moving inside. It comes with 3x 2.5" HDD and 3x 3.5" HDD toolless trays - the number of bays is the reason I bought this case over a Fractal Design Focus G. The 5 1/4" bays (3 of them) are also toolless, but I dropped a screw into those just to be safe. Here's where things get a bit tricky. First, if you have an aftermarket cooler that uses some other form of mounting other than the standard Intel/AMD mounting OEM fan solutions, I highly recommend that you install your CPU cooler first and connect the fan(s) now. I am using an ID Cooling SE-207-XT Slim and adding a fan over my RAM sticks (G.skill Ripjaws) causes the fan to stick right up to the 155mm height limit for CPU coolers imposed by this case. Next, if your motherboard 4 or 8 pin CPU connector is in the back, top corner of the motherboard, you really need to install that connector BEFORE you install your motherboard when using a large aftermarket cooler. There are no holes in the case that will facilitate routing the CPU power connector behind the motherboard tray. Once the motherboard is in, you will find it difficult later to install the CPU power connector, especially if you have giant Shrek hands like me and a large CPU cooler. Now here's where it gets interesting. I installed my PSU and the top case fan first. IMO, in order to install your CPU power connector safely, you should install your PSU first so it doesn't fall and yank on the motherboard by accident (that didn't happen to me, but I could see it happening to me sometimes the way I do things). I installed the PSU first and top case fan, then the CPU power connector and CPU fans. However, if you do this, make sure you have not installed any fans on the top of the case (which the case specs don't mention they exist, but you can install 2x 120mm fans on top - I don't think a 120mm or 240mm radiator liquid cooling solution would fit here, so only fans). I did install a single 120mm Noctua fan on top (towards the back of the case) and as a result, my standard ATX motherboard could not be installed because I could not angle/twist the board to get around the top case fan and the PSU with the large CPU cooler installed. What I did was remove the top case fan, then install the motherboard (ASUS B550 Tuff Wifi II). It was still tight, but it made it. Getting the 2x motherboard screws into the holes along the top of the case (by the motherboard shield and CPU cooler) would have been impossible without a screwdriver from iFixit that was magnetic so I could get those screws down in there. A carefully held and rotated screwdriver allowed me to tighten the screws down. Keep in mind, a standard ATX motherboard will fit, but it will be right up against your PSU and the top case fan(s). Then, once in, I had to carefully bend down/angle the 8pin CPU power connector wires, so that I could squeeze and gently force in the 120mm Noctua top fan into place. As others have said, the top fans are not really meant to be installed inside, but I am stubborn, and they were going inside no matter what. I made sure to connect my CPU cooler and CPU fan headers before I installed the motherboard. Make sure the CPU fan wires are not encroaching on the fan's domain. Let's finish up - the sides of the case are whole (not hole). There are no holes, no fan mounts, no windows on the case side panels. For me, that's okay. I'm building a 5700G proxmox server and I don't expect to push this to extremes. Final complaint, the rear included fan is only a 3 pin - could have been a 4 pin. ### PROS I like the hard drive and external drive bays - it was the number I was looking for (needed 3 external). I do like the compactness of it, just not what it takes to work around that. There are holes and cutouts throughout the inside of the case which makes for easy cable management and cable routing for almost all of your cable needs, to keep cables out of the main case cabin to facilitate better airflow and for a more clean look. Also, was very surprised to find generously long USB 3, USB 2, and audio front panel connectors. So many cases skimp on the length of these cables forcing you to run these cables right through your motherboard and GPU area and/or to put a lot of pressure and pull on your motherboard headers which I don't like. The USB 3 connector also was fairly flexible compared to other case USB 3 headers where the cable is VERY stiff and likely to break off of the motherboard header. The packaging also came with a couple of decent length tie straps for cable management. The side panel screws are thumb screws (which means you don't need tools to remove/replace the side panels). I like that. With a standard ATX, an LG DVD/Bluray drive, and a Kingston 3.5/2.5" single bay removable drive bay installs with room for the cables and my cooler. Lastly, the bottom of the case where your PSU goes has a dust screen opening for your PSU if you mount your PSU fan downwards that way. Bottom line, the case does (or will do) what I bought it for. It could be better like better quality it terms of sturdiness, motherboard mount flexibility, better front fan mounting solution, a bit more room on the top (like 1" would be sufficient I think), side window panel and fan mount, but all in all, a decent case for my needs. I would buy the case again for specific non-extreme uses, but exceeding that spec, you may want to look for another case if additional fans or liquid cooler are your preference. The case might be better suited for mini/micro ATX and ITX motherboards, but with patience and the right tools, you should be able to get the job done with a standard ATX.
A**R
Great Chassis
I found this ATX case to be exactly what I wanted. My full size ATX motherboard was a perfect fit. To those who say the cabinet is flimsy I call BS. It is the same huge of steel I have had in the last decade. The screwless fasteners worked perfectly. All of the accessory slots also worked well. Very satisfied customer.
B**L
No fan clearance for gaming motherboards
I am disappointed with this case. It's everything I wanted as far as expansion slits, breathability, and size. The problem is you can not mount a gaming motherboard and the b mound the fans. My board (asus B 550-F ) has heat sinks around the outside of edges of the board and it totally prevents the top two cssr fans from being mounted and the reat case fan from being mounted in tbe holes provided from the factory. Plus the front case fan mount will not allow a 120 mm fan to clear the dust filter without it rubbing in the blades. You would think Thermaltake would allow clearence for the newer gaming boards as most all makes have the added heat sinks. Unless you want to do slot of drilling and modifications to the case it is NOT compatible with the newer gaming boards that have the additional heat sink shrouds .
Trustpilot
3 weeks ago
2 months ago