


Buy anything from 5,000+ international stores. One checkout price. No surprise fees. Join 2M+ shoppers on Desertcart.
Desertcart purchases this item on your behalf and handles shipping, customs, and support to Indonesia.
๐ Unlock your next projectโs potential with effortless keypad control!
The NEXTION 16 Keys Matrix Keypad is a compact 4x4 membrane keyboard module designed for Arduino and similar development boards. Featuring 16 keys arranged in a matrix with 8-pin wiring, it supports easy integration via the standard Arduino Keypad library. Its slim profile and straightforward interface make it ideal for projects requiring numeric and function input, delivering quick setup and reliable performance for makers and professionals alike.
| ASIN | B07B4DR5SH |
| Additional Features | Programmable via Keypad Library |
| Antenna Location | Gaming, Office |
| Best Sellers Rank | #247 in Security Access-Control Keypads #2,969 in Computer Keyboards |
| Brand | NEXTION |
| Built-In Media | 1 x 16 keys keypad |
| Button Quantity | 16 |
| Color | Black |
| Compatible Devices | PC, Arduino-compatible boards |
| Connectivity Technology | Wired |
| Customer Reviews | 3.9 out of 5 stars 66 Reviews |
| Enclosure Material | Plastic |
| Hand Orientation | Ambidextrous |
| Item Weight | 0.81 Ounces |
| Keyboard Backlighting Color Support | Single Color |
| Keyboard Description | Membrane |
| Keyboard Layout | QWERTY |
| Manufacturer | DIYmalls |
| Mfr Part Number | WI0840 |
| Model Number | WI0840 |
| Number of Keys | 16 |
| Power Source | Wired |
| Recommended Uses For Product | Gaming, Office |
| Special Feature | Programmable via Keypad Library |
| Switch Type | Tactile |
| Theme | RGB |
| UPC | 702795764562 |
| Unit Count | 1.0 Count |
E**R
Works Great Out of the Box
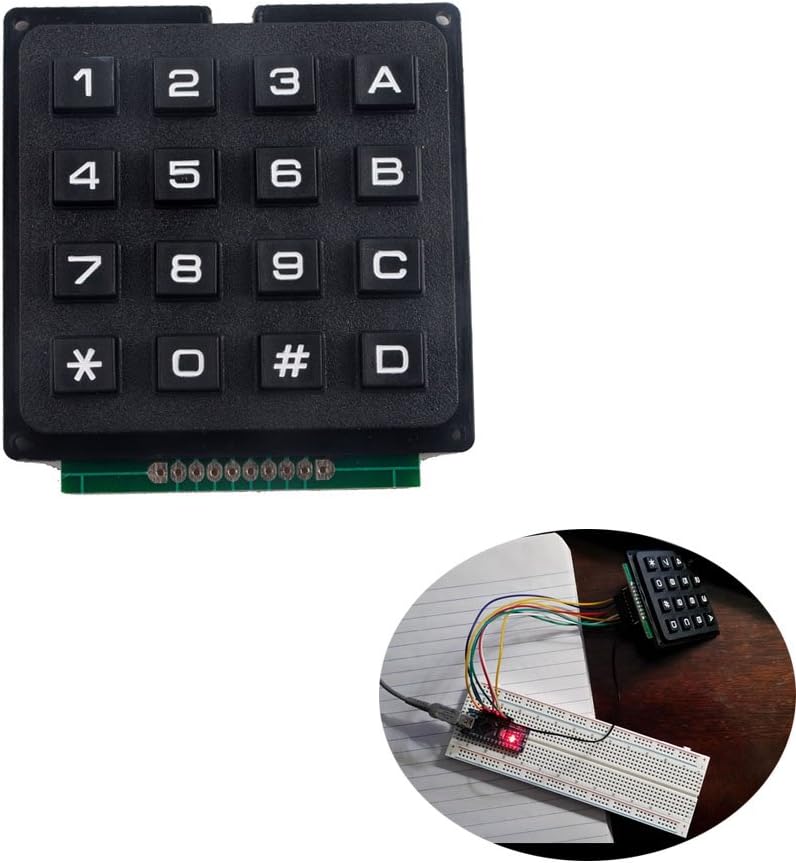
Was skeptical because of the weird reviews. This is just a standard rows and columns matrix. I used Arduino keypad library and had it running in 5 mins. Install library, open the Custom Keypad sketch. See what pins to connect where. I changed two of my rows from 0 and 1 (default in the library) to 8 and 9 so it wouldn't interfere with serial communications. So mine looks like this: byte rowPins[ROWS] = {3, 2, 8, 9}; // Skip the first solder pad so solder pads 2, 3, 4, and 5 connect to digital in 3, 2, 8 and 9 byte colPins[COLS] = {7, 6, 5, 4}; These connect to pads 6,7,8 and 9. Ignore the 10th pad . THEN adjust the sample code to THIS keyboard's layout: char hexaKeys[ROWS][COLS] = { {'1','2','3','A'}, {'4','5','6','B'}, {'7','8','9','C'}, {'*','0','#','D'} }; Upload the sketch, open your serial monitor, making sure it is set to 9600 baud. And voila. Easy peasy. Nice looking keypad for cheap.
A**N
Resistive contacts
the contacts inside are giving resistive connections some as high as 680 Ohms. varies from row to row and column to column. not sure if this is due to material of contactor or if it is due to contamination on the board but it can cause issues when trying to use this with Arduino boards. definitely not a quality product. UPDATE 6/19/19: the problem is that they used resistive paint to bridge over from point to point instead of going to a double sided board. this causes a resistive connection on those pins that are connected in this manner. it also causes a resistive connection to some of the traces that are bridged and makes a mess of the matrix. I had to go in and carefully scratch off the resistive paint in places and then very carefully remake the connections using 30 gauge wire. haven't finished it yet but it should work. getting rid of the paint is the hard part. Otherwise this thing is just useless. too much work for a cheap made part. if they had just used some sort of solid insulating material first to isolate the etched circuits then used like copper tape for the connections it would have been ok. this problem combined with the rubber membrane style contactors make it just plain junk.
T**N
Works sometimes
After a few weeks of use the keys don't always send data to controller
D**V
Works great once you figure it out
The construction of the keypad is nice and strong. There was a little bit of bending of the board where the headers are supposed to be soldered on. You may notice this when you go to solder some on. It also took a little work to get a standard 2.54mm pitch header in due to the holes on the back not being large enough to accommodate them. Bear in mind that you don't need the outer two pins on the left and right for wiring. It's the inner 8 pins that matter. If you solder on a header, I highly recommend laying down some flux on the pads first, inserting the header pins, then soldering. Aside from the schematic in the product listing, the rest is left as an exercise for you to figure out. After doing some digging around, I found some bits of code. The standard Keypad library for Arduino works out of the box with this particular device. However, the one thing you have to understand is how the rows and columns work in the pinout. I think having a simple one-sheet that ships with the keypad would make it a lot easier for folks that might not have experience with these kinds of devices. Ignore the first and last pins on the keypad. The next 4 pins, let's call them 1-4, are for row addressing. The next four pins, 5-8, are for column addressing. When hooking up your Arduino it can save you a lot of headaches knowing that when you wire everything in. In all, you'll need 8 I/O lines to run this, as opposed to the usual 17. Which makes this usable for even an Uno or Nano. The keys were very responsive with the microcontroller, and once the Keypad library is configured for your pinouts, you don't have to worry about it unless you change which pins are used on your micro. All in I'd say it took roughly 30 minutes to get it all set up properly with my project. I also like the Eurostile typeface used on this particular keypad. It reminds me a lot of the hardware depicted in 2001: A Space Odyssey.
W**N
easy to use with arduino
I use this keyboard in many of my projects as the code is easy and makes sense. They can be used in any project that requires simple data entry involving the numbers 0 to 9 along with the letters A to D with pound and star sign ...Thanks for the great manufacturing and service.
J**I
Works just fine. Instructions in the description were helpful
Once I managed to do a proper soldering job the keypad worked just fine with my ESP2866 Node MCU board. Not much else to say. Feels pretty solid, no complaints. Had to adjust the example code because of the different layout of the ESP2866 board but no big deal.
S**.
๐
Works great ๐ I used flux on the pads because my eyes bad.
G**N
Very poor contact resistance. Poor solderability.
It would be difficult to make a more promising-looking product that then turns out to be this poor. 1. The pads are very difficult to solder -- the trace material (or it's plating) is very reluctant to wet, even with copious amounts of flux. Additionally, this is a single-sided PCB, so if you're intending to solder a 1x10 (or 1x8) row of header pins, it can only protrude from the rear. That fits some scenarios and not others. 2. Under normal finger force, and bearing in mind the snap action implies there's contact once snapped, is in the range of 2k to 10k ohms. By applying a lot of force you might get it down to 500ohms. Normally, a product touted as "switches" would have contact resistance in the range of 1 ohm. These switches are likely to either fail to work at all, or work very unreliably, with the built-in pull-up resistors in typical MCUs. This high resistance explains a number of the complaints in other reviews.
J**Y
I had problems getting my project to work .
I found the resistance of the keypress for the matrix was different for all keys pressed. Sooner or later they will probably cause problems as comments I found about this product being sold on U-buy.com. See attached jpg.
Trustpilot
1 month ago
1 month ago