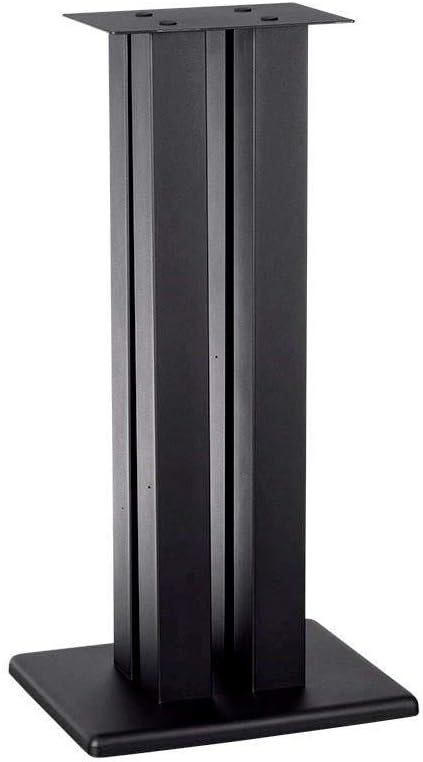
This is a good product capable of supporting a fairly large/heavy “bookshelf” Type speaker. It has a couple of ideosyncracies that can be dealt with during assembly and one arguable acoustic flaw that the designers allowed for easy correction of. For ref, all hardware is M8. I knocked off 1 star because of the overcome-able fit issues described in the text below, but these can be made into 5-star stands albeit by spending a bit more to enhance their performance. I’ll take steel stands over wood or MDF any day and my non-audio crazed wife will back me up. Please be aware that these are sold as individual units and not as paired sets. You need to purchase one stand for each speaker you intend to mount. Packing: The parts are well packed in triple wide heavy duty corrugated material with corrugated separators and poly bags keeping everything firmly secured. One of my boxes had a fair amount of “road rash” but none of that penetrated to any parts. A single exploded assembly diagram is included, but provides no real instruction detail or written assembly sequence. It’s a fairly intuitive assembly via the provided diagram, but a little thought and prep is helpful as mentioned below. A lot of questions are also answered in the specs and various user reviews. They’re worth going through. Construction first. These are all steel so in the case of an unfilled finished stand, you’re looking at 20.9 lbs empty weight for a 28” tall stand with the only variable between stands being the length of the four 2”x2” square posts. The base is a heavier gauge steel making up approximately 3.8 lbs of the overall weight. It’s formed along each of the four edges and welded/sanded at each corner. This provides stiffness and depth for a pair of rails that have two M8 threaded holes each for the included spikes the stand will sit upon. Note that spike pads are NOT included so if you plan to use the spikes on non-carpeted surfaces, you’ll need buy some or ruin your solid floors. Alternatively, there are many choices out there if you wish to swap out for alternative feet and/or spikes. Note that the welding, while sanded down is not exactly craftsman quality and leaves the bottom of the side flanges a bit uneven, so you’ll need some sort of spike or foot (4/stand). This bottom plate has eight holes for the post attachment via two M8 screws per post. The top plate the speaker will sit on is a smaller single sheet with four embossed holes providing for the four flat head screws that secure it to the four steel posts (1 screw per post). Prep and assembly: It is highly recommended you fill the 4 posts of each stand with something to dampen the very obvious resonance of the tubes. If you don’t they’ll ring like wind chimes, especially with larger speakers. Even if you don’t think the ringing is a listening issue, you’ll be wasting the energy from your speakers and will be losing bass response and treble clarity narrowing the range of sound you do hear. Of course we tend not to miss what we don’t know about, but on a good system, solid, well damped stands is about the single most effective speaker “mod”:you can make per $ spent. The easiest and best material is silica play sand which is finer than beach sand or what you can dig up and can be purchased or ordered from any big box hardware store, typically in 50 lb bags. You’ll need at least 25 lbs for a 2/3 fill height of the 28” stands. The silica sand will set you back about $30, but you’ll be cursing the $6 bag of “natural” play sand when you try filling the posts. Before adding any fill, make sure the bottoms of the posts are sealed. I’ll describe an easy way to do that later. You can also use regular beach sand or other “natural” sand, but it needs to be kiln dried or dried in your oven as it will almost always have a high percentage of trapped moisture in it which is not good for steel stands. Silica play sand BTW is man made and is both more dense and has more uniform grain size for better dampening; it’s worth the extra cost because it can be used out of the bag and will flow through a funnel and into the steel posts much easier than natural sand. Please do NOT use kitty litter for a filler. A lot of folks do, but for a steel stand it creates some issues. 1) while it will dampen out some resonance, its density is a fraction of silica sand and will help little to prevent tipping over if the speaker is hit. 2) it can smell over time or so I’m told. 3) kitty litter will absorb moisture from the air and start your steel stands to rusting from the inside out if you live in a higher humidity environment. If you want more detail on fill heights and what it does to help the stands, you can use chatGPT to describe what you’re doing and get some additional help. If your speakers are over 20 lbs each, I suggest first filling with some steel shot to lower the center of gravity so the finished product will be less prone to tipping over from the efforts of cats, dogs and small children. Even a couple of pounds in each post will lower the center of gravity a good bit, making the stand less likely to tip. I used about 0.6lbs of 6.35mm (1/4”) ball bearing balls per post (2.4lbs per stand) and about 1.8 lbs of 2mm (0.078”) dia steel in each post (7.5 lbs per stand) and then topped it with silica sand until each post was about 65% full. 15lbs of 2mm shot, AKA #10 or S-780 will run about $50. Between that and silica sand, you’re looking at about $40 added to stand cost, or $80 for a pair, but you’ll have a “pro-level” stand weighing about 41 lbs each that will be dead silent and able to withstand most jumping cats and slight collisions from dogs and kids. Over time, vibration will cause the silica sand to settle a little and fill in the gaps around the steel shot further dampening the stands. This will eventual result in about a 64:36 ratio of steel to sand and further lower the stand center of gravity. Before assembly of anything, seal the inside edges at the bottom of each post. The welds and seams on mine were very good, but I used a bead of clear silicone window in each bottom to be sure. Keep the bags on the posts as you work to help avoid any paint damage. After the caulking cured, I loosely attached each post to the base. Laying and supporting the stand level on its side, I used carpenters squares to make sure the 4 posts were square to each other as I tightened the screws. This will help later on when the top plate is attached because the tapped screw hole at the tops of the four posts will NOT align with the holes in the top plate. This squaring step adds 10 minutes or so, but will help minimize that alignment issue somewhat. If filling the posts (especially with any sand product), before doing so, remove the protective bags and cut four of them into equal halves. Take one of the bag halves, flatten it some and then us in a yard stick at the center of the bag section, push it into a post. Use the yardstick to tamp it down at the bottom of the post. Repeat this for each post until all of them have a bag half tamped down at the bottom. I got this idea from a video review I saw and tried it. This is a further protection against anything leaking out and is perhaps the easiest way to do it. The other reviewer has never had a sand leak and so far, neither have I. It’s easy, clean and can’t hurt. In any case, you might want to attach your spikes or feet to the bottoms at this time. I used a flat bottomed metal foot with a steel ball inside supporting the upper part of the foot screwed into the M8 threaded holes on the bottom of the stand. They’re supposed to work like a spike and seem to. FWIW, I always avoid rubber and go for a spike (or steel ball) between the stand and the floor or spike pad. Spikes or spikes on small metal spike pads are the best option for vibe isolation and mechanical coupling to the floor. YMMV depending on your equipment. After all of the posts are filled keeping the upper 3rd of the posts empty, it’s time put the top plate on and finish the assembly. You may wish to add a rubber pad covering the four posts, or seal it at the top edges of each post with Silicone caulk to prevent sand escaping if knocked over, but that may be more trouble than it’s worth, I do almost guarantee you will see gaps between the top plate and the posts, but since these generally don’t go anywhere after placement I don’t personally worry over the small gaps that cannot be seen except on hands and knees. I could argue that it allows for evaporation of any otherwise trapped moisture, but I might just be rationalizing. Get your screws started one by one. It may take a good bit of force on any given post to get its tapped hole aligned with the hole in the top plate. Good lighting helps you get things aligned. My first set was a real bear, but the 2nd aligned much easier. Just luck of the draw. If your speakers are over 10-15 lbs, you should use BLUE-Tac to secure them to the tops of the stands. Don’t use silicone feet up there as it will undo some of the benefits of dampening the stands as the silicone will allow your speakers to shake a little. Under 10 lbs, and the silicone is relatively solid by comparison to speaker made and is fine. This is more of an issue over 25 lbs of speaker. Honestly you may never hear a difference on most systems, but I hate giving up any advantage I don’t have to. A pea sized ball of blue-tac at each corner of the top plate will do it in most cases. Go to 1/2” marble size over 25lbs. Some people recommend a thin felt pad at the rear edge of the top plate, if something sounds funny or buzzy, but my little vintage fuseliers are quite happy pressed down on the blue-tac and the sound is a very dramatic step up from the mdf stands I had before that my wife noticed immediately when she walked in later that day. Have fun - audio is a great hobby but make sure your significant other agrees as it can get pricey ;-)