Desertcart purchases this item on your behalf and handles shipping, customs, and support to Indonesia.
๐ Light up your Jeep, own the night, and never blend in.
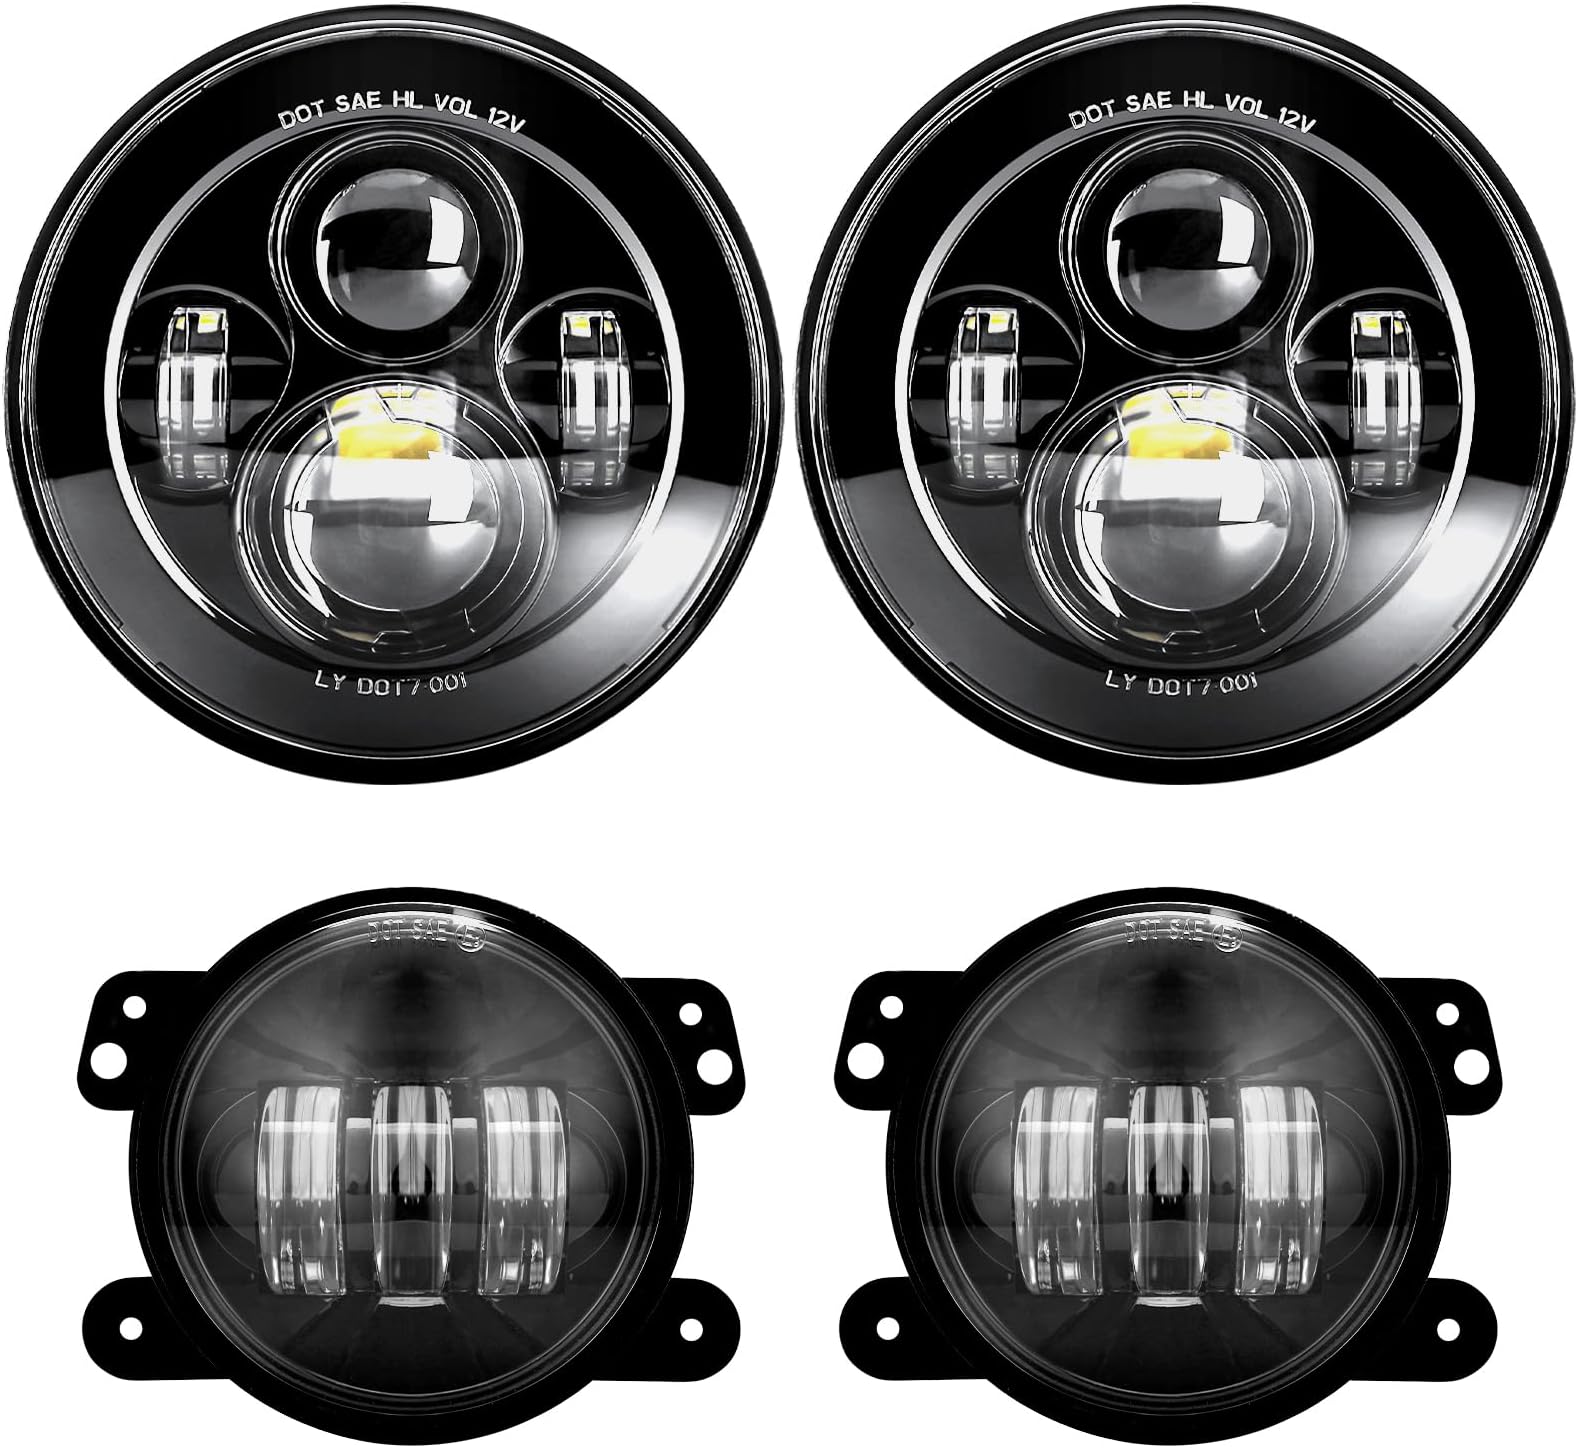
The LX-LIGHT DOT Approved 7'' Black LED Headlights paired with 4'' LED Fog Lights deliver ultra-bright, legal-compliant lighting designed specifically for Jeep Wrangler models from 1997 to 2017. Featuring 4500 lumens on high beam and IP67 waterproof durability, these plug-and-play LEDs upgrade your vehicleโs visibility and style with minimal installation effort. Built with premium US LED chips and rugged aluminum housing, they promise over 50,000 hours of reliable performance, making them the ultimate lighting solution for Jeep enthusiasts who demand both function and flair.


| ASIN | B01KNXSIYS |
| Additional Features | Waterproof |
| Auto Part Position | Left |
| Automotive Fit Type | Vehicle Specific Fit |
| Best Sellers Rank | #60,115 in Automotive ( See Top 100 in Automotive ) #265 in Automotive Headlight Assemblies |
| Brand | LX-LIGHT |
| Brand Name | LX-LIGHT |
| Color | Black |
| Compatible with Vehicle Type | Compatible with 1997-2017 Jeep Wrangler JK JKU TJ LJ Freedom Edition Hard Rock Rubicon (some need extra mounting bracket), Sahara, Unlimited Hard Rock Edition, Willys Wheeler, Altitude, Dragon Edition, X Sport Utility...2-Door, 4-Door.(some Hard Rock,Rubicon X,Anivesary,10th Anniversary Editions,may need extra mounting bracket) |
| Customer Reviews | 4.4 out of 5 stars 3,219 Reviews |
| Is Assembly Required | Yes |
| Item Dimensions | 7 x 7 x 3 inches |
| Item Weight | 4 Pounds |
| Lens Color | Clear |
| Lens Material | Plastic |
| Light Source | LED |
| Light Source Type | LED |
| Manufacturer | LX-LIGHT |
| Manufacturer Part Number | LX-RHLFL746 |
| Manufacturer Warranty Description | one year warranty |
| Model Number | 8542082398 |
| Model Year | 1997 |
| Specific Uses For Product | Head Lights |
| Vehicle Service Type | Compatible with 1997-2017 Jeep Wrangler JK JKU TJ LJ Freedom Edition Hard Rock Rubicon (some need extra mounting bracket), Sahara, Unlimited Hard Rock Edition, Willys Wheeler, Altitude, Dragon Edition, X Sport Utility...2-Door, 4-Door.(some Hard Rock,Rubicon X,Anivesary,10th Anniversary Editions,may need extra mounting bracket) Vehicle Service Type Compatible with 1997-2017 Jeep Wrangler JK JKU TJ LJ Freedom Edition Hard Rock Rubicon (some need extra mounting bracket), Sahara, Unlimited Hard Rock Edition, Willys Wheeler, Altitude, Dragon Edition, X Sport Utility...2-Door, 4-Door.(some Hard Rock,Rubicon X,Anivesary,10th Anniversary Editions,may need extra mounting bracket) See more |
| Voltage | 12 Volts (DC) |
| Wattage | 90 watts |
| Year | 1997 |
J**K
Great Lights. Awesome
Great upgrade! They look and so far function awesome! The below install guide from user RAAB in this very was extremely helpful. See below. I would add to make sure you youtube the turn signal installation. This was helpful to me. https://www.youtube.com/watch?v=3vLKkoJxXb4. It addresses the turn signal load resistor that you will need to set up. I got the headlights, fogs, turn signals and side markers. Took us 3 hours partly because we had to remove a custom bumper as well. They are really nice and bright! I have already received compliments. I would recommend buying these as my other options including JW were $700 and up just for headlights. Headlights ======== 1. REMOVAL: Park in a garage or near a wall and turn on the lights. Mark the center of the beam (horizontally and vertically) for both headlights and both fog lights. This is used as a reference for aiming the new lights. Turn off the lights and remove the grille (you tube videos show you how, takes 3 minutes) and remove each headlight bezel by unscrewing the 4 small torx bolts that hold them in. The headlights come right out after that. 2. INSTALLATION: There is some slight modification required to install the new headlights. Each headlight has three extrusions (tabs) that fit into slots in the headlight housing on the Jeep. One slot is at the bottom (6 o'clock) and the others are roughly at 10 o'clock and 2 o'clock. This is to make sure the headlight is oriented properly and ensures a snug fit. The driver side headlight fits snugly with no issues. However, the 10 o'clock tab on the passenger side is a bit off from the factory headlight housing--about 1/16th of an inch. This means the headlight will not sit flush in the housing without modification. The 6 o'clock and 2 o'clock align ok, so I used a dremel to cut off the lip of the 10 o'clock housing slot on the Jeep (widened the slot). The headlight was able to fit flush after that and without and play (it was a tight fit). Easy plug and play after that, just reinstall the bezels after you have adjusted the headlight aim accordingly. 3. OPTIONAL: When the headlight bezels are removed, it is a good time to paint them black if you choose. I used a flat black trim paint, 3 coats was sufficient. However, I used a dremel to scuff up the surface of the bezels since paint does not like to stick to chrome. The micro scratches on the surface of the chrome helped with adhesion, and the black bezels blend in nicely with the lights. Worth the extra time and money in my opinion. Fog Lights ======== 1. REMOVAL: With the grille removed (step 1 above), it is necessary to remove the bumper trim between the front bumper and radiator. It is a flat 4" wide by 4' long rubberized plastic strip that is mounted to the frame with two plastic body screws. They are easily accessible, just unscrew and pull them out. This trim piece is required to be removed so the fog lights can be installed, they are too big to fit between the frame from underneath. You also need to remove the plastic splash shield under the Jeep. For mine it required pulling out 6 plastic trim retainers and it dropped right down. No tools needed other than a flat tip screwdriver to pry the retainers out. Earlier JK versions I believe required a philips screw driver. There are you tube videos on this as well. Each fog light sits in a plastic bracket that is screwed to the inside of the bumper using 4 philips head screws. I had to use a shorty philips screwdriver on the driver's side fog light because of some interference issues. When unscrewed, the entire fog light assembly comes out. 2. INSTALLATION: The fog lights that came in the set were installed in cheap plastic housings and the lights would jiggle a little bit in them. I prefer not to have my fog lights bouncing up and down when driving. Additionally, the adjustment screws are mounted on the wrong sides of the housing, so they cannot be adjusted after installed. Because of this, I popped the lights out of the supplied housing and installed them into the stock housings. If you decide to do this, here is what I did: 2.a. Unscrew the philips head adjustment screw from the old fog lights completely, be careful not to lose the spring or the screw. Both of these will be reused for the new fog light. 2.b. Pop out the light from the old housing. There are two tabs on the sides of the light that secure it in the housing, you just gentle pry away the housing away from these tabs to release the light. 2.c. Install the new lights into the old housing. The fit should be as snug as the factory fit. Make sure the fog lights have full range of motion up and down. I had to cut off a little 1/8" tab on the back side of the old housings that were interfering with the full range of motion. This was done with a box cutter. 2.d. Install the old adjustment screws and springs. The adjustment screws will thread into the new lights with some effort since the threads are more coarse, but the diameter is the same. You just end up rethreading the housing. This enables you to adjust the lights using the factory holes in the frame and is a much more robust installation! 3. Reinstall the fog lights, plug them in, reinstall the splash guard, trim, and grille, and adjust the fog lights as needed. As you can see, there is a little bit of modification required if you want a quality install, but the lights are great quality.
T**K
Great Lights. Awesome Customer Service.
***Great Customer Service*** First off, I have to give credit to LX-LIGHT for their exceptional customer service and product support. I bought these lights in late 2017 but never had a chance to install them until now. These were shipped to my house in the states while I was on military orders to Japan. When I came back home in late 2019 and was finally able to install them, one of the fog lights had a rattle. I took a chance and asked LX-LIGHT if I could obtain a replacement just for that one fog. They were extremely nice and ensured me that they will take care of everything. I sent them a picture my install and a week later, I got a new set of lights...no fuss! They really went above and beyond and exceeded my expectation in every way. They really do stand by their products! ***Awesome Lights*** This is really a great looking set of lights. Installation was easy and straight forward. You definitely need to take the grill off. Detach the turn signal harnesses or bulbs. If you have stock bumpers, remove the plastic panel covering the frame behind it for easy access to the fog lights. Fitment was generally pretty spot-on. My passenger side headlight was a little tight fitting when trying to seat it in, but trust me, it fits. The fog lights also included harnesses to adapt its connectors to your existing wiring. No modification needed! Afterward, put everything back on and adjust the beam. You will have to adjust the aim of your beam down a bit for these lights. They are super bright and fills the road very well. Check out the pictures I uploaded. The one at night is low beam on the freeway. Overall, I am satisfied with this purchase. Thank you!
J**F
Nice and bright, huge improvement over stock, read for install notes!
Bottom line up front: 4 stars because the lights are great, only reason its not a full 5 is because the passenger side headlight needs trimming. Now for the detailed write up and instructions. These are such a huge improvement over stock JK headlights and fog lights. Time will tell if they hold up any amount of time because some reviews on here seem to suggest they may not last long. If that day comes I will adjust this review, but for now I give them 4 stars....the only reason they do not get 5 is for fitment on the passenger side headlight like several other people mentioned which I will explain in detail. The install took me 20 minutes because I have taken the grille assembly and bumper off several Jeeps and I am quite familiar. For the average person who is not so familiar I would say give yourself an 1 to 1.5 hours. TOOLS Phillips head screwdriver T15 Torx (easiest when attached to a screwdriver type handle, but a socket wrench with an extension works fine too) Flat head screwdriver Pliers 4 wire T-Taps (for the fog lights only, they have to be hard wired in) Metal file or a Dremel tool REMOVE THE GRILLE -Raise and support the hood -Use the flat head screwdriver to pop out the centers of the 6 plastic pop rivets that are along the top of the grille, then pull out the inner part of the pop rivet, set aside for later. -Reach around under the fender on each side and twist out the turn signal lights and let them hang in place -Starting at the top grasp each side and pull forward to release the metal holding tabs, then work each bottom corner out (those tabs are slightly above where the turn signals were) REMOVE THE HEADLIGHTS -Use the T15 torx bit to remove the 4 screws holding the headlight assembly and headlight ring in place. Note the headlight and trim ring can fall out once you get the 4th screw removed, have a hand on it to steady it just in case. -Remove the electrical connection on each headlight and set the headlight assembly and trim rings aside. REMOVE THE FOG LIGHTS (if replacing them also) -Disconnect the electrical connections by sliding the locking tab towards the back of the Jeep, then press down on the thumb tab and pull. -At this point you have two choices, remove the bumper fascia, or just loosen it....loosening is the easiest option so I will cover that for the most part. Removing it involves 4 bolts, two on each end. The fascia can be removed without removing the whole bumper itself by lifting it in an upwards and forward motion to clear the tow hooks. -Regardless if you choose to loosen or remove completely the location of the 2 bolts on each side are hard to explain easily but just run your hand along the back of the plastic portion of the bumper, you will feel a recessed portion and they are in there. The 8 larger bolts (4 on each side) as you get closer to the frame rail are for removing the entire bumper, metal, plastic fascia and all. Loosen or remove those bolts to remove the fascia...however you prefer. -Remove the 2 screws that hold the plastic trim panel that sits inside the front bumper (basically where a winch would sit is the plastic piece I am talking about). Once the plastic screws are out, pull the piece off the jeep to give you more room for fog light access. NOTE if you remove the bumper this portion does not apply. -Locate the fog light housing, and the 4 phillips screws that hold each light in place. They are on all 4 corners of the fog lights. Remove them to pull the fog lights out, housing and all. HEADLIGHT INSTALL -place each new light in the old trim rings from the factory headlights noting the orientation of how they fit in relation to the holes on the trim ring, they can only go on one way. -Driver headlight: this light will seat perfectly, the DOT stamp on the headlight should be on the top and the notched portions will seat into the headlight panel on the Jeep. Once seated firmly, screw the trim ring back on using the T15 torx screws. -Passenger side: note this one needs a slight trim. Before you trim the light, attempt to mount the headlight first, you will likely find that the notched portions dont want to fit right. Place the headlight face up on a table so you are looking at the LEDs/front of the assembly and the DOT stamp is on top. Now look at the top left portion of the headlight...that notch on the back is the one you want to file a little. Dont file it too much or try to completely remove it, just work it enough so that you round off the outer edge still leaving it mostly in-tact. -Take the now filed light back over to the Jeep and pop it in place, if you filed correctly it should take minimal force to get it popped into position....once you get it in place be sure not to let it go and have the trim rind and a screw ready, it may pop back out from tension. If it just does not fit, take a look and file a little more on that same notch. -Once each headlight is back on DO NOT PUT THE GRILLE BACK ON YET IF YOU ARE ALSO REPLACING THE FOG LIGHTS (if you left the bumper on that is)! The gap created by the grille not being there gives you a lot more room to work with. FOG LIGHT INSTALL -Remove the electrical connections from the fog lights if they are connected out of the box (mine were). What you want to look for, is the connector that has the plug on one end which fits the fog light connector, and the two open wires on the opposite end. -Using the T-Taps and pliers, connect the open ended wires to your factory fog light wiring as follows. -Back at the front of your Jeep, locate the fog light wiring behind the bumper. Pull the plastic wire shielding tube apart slightly so that you can pull the factory wires through the protective sheathing. -Attach the black wire to the black wire from the new fog light wiring harness, and the white and red striped wire on the Jeep side to the red wire on the new light wire harness. -Wrap with electrical tape to ensure it stays clean and undamaged (also wrap the stock connector that you are no longer using, or you could just cut it off if you wanted to but I like to keep those stock connectors on in case people swap factory equipment back in before trading a Jeep in/selling/whatever). -Reinstall the fog light using the 4 phillips screws. NOTE that the new lights are shaped just like the old ones, the two larger mounting tabs on each light are the top portion. -Attach the plastic trim piece (the "where a winch would normally be" plastic part) using the 2 plastic screws from earlier. -Tighten down or reattach the bumper fascia or bumper itself however you decided to take it apart earlier. -Pop the grille back in by starting at the bottom corners and aligning the metal tabs just above the turn signal lights, then work your way along the top securing all of those metal clips. -Put all the plastic rivets back in along the top of the grille (just push them in) DONE! It sounds like a lot but its incredibly simple provided I am not a horrible instruction writer!
M**Y
Great LED option for Jeep JKs
Iโve owned a 2007 Jeep Wrangler JK Unlimited since 2009. Because the stock lights are so mediocre, I purchased an H4 bulb upgrade kit within a year of owning the vehicle. The H4 lights provide only marginally better light, and I seem to have to replace the bulbs every 9 months or so. I finally got frustrated with constantly replacing the expensive bulbs, and I looked for an LED solution. I was getting ready to purchase a headlight/fog light kit through a popular Jeep part vendor and decided to check out Amazon. I was hesitant to purchase these replacement lights from a vendor I was unfamiliar with, but I decided to pull the trigger because: -the price is substantially lower than competing products -the design is quite attractive with matching headlights and fog lights -the anti-flicker module is built in to the headlights -the reviews were quite positive -the company seemed very responsive to issues on Amazon -the lights are DOT certified I installed the lights about 5 days ago. The light kit was boxed securely in a no-frills, molded foam cushion with peel-off plastic protecting the lenses. The fog lights included an adapter harness with bare wires (I didnโt need it), and the headlights came with two sets of adapters (I also didnโt need them since Iโd previously upgraded to the H4 bulb connector). I started by replacing the stock fog lights in my aftermarket bumper. The new fog lights have the same mounting points as the factory units, and they are the same outer diameter. They are thinner, and the light aiming adjustment mechanism seemed more robust than the stock units. The install went smoothly, and the factory electrical connectors fit securely. I installed the headlights next. The new headlights feel substantial with a powder-coated cast aluminum heatsink on the back. They use an H4 style connector, so you may need one of the included adapters. In order to install the headlights, you must first remove the Jeepโs grille. Next, four Torx screws must be removed from each headlight so the unit can be unmounted. There is a ring bracket around the headlight which mounts it to vehicle; this ring must be saved for new headlight installs. With my stock headlights as well as the name-brand aftermarket headlights, the lamps did not fit securely; they relied on the bracket to squeeze them into place. These LED headlights fit perfectly into the sockets, and installing and testing them took less than 10 minutes. The light color is a cool white but not blue; I would guess a color temperature of 4500 to 5000k. They are just a little cooler than the Silverstar lamps I had previously. The light is exceptionally intense, and I have not noticed any PWM flicker yet. I havenโt had the chance to test these at night yet, but I imagine theyโll be much better than my previous set. In a future update, I will try to post info about their light pattern and how well they've held up. Overall, the price, apparent build quality, company responsiveness, DOT certification, OEM style install, built-in flicker modules, good looks, and light intensity make these a great buy.
S**D
Excellent fit!
Great upgrade for my Jeep! The headlights are super bright with a clean, modern look, and the fog lights add extra visibility in bad weather. Installation was straightforward, and everything fit perfectly. Night driving is much safer now. Highly recommend!
J**N
Good price to quality choice.
So the reviews for this are pretty spot on. I have a 2014 JKU. Install is very straightforward and easy. Just pop off the grill and a few torx screws and the old are out and the the new are in. Like other reviews previously stated the driver is a perfect fit and the passenger requires modification. Iโm assuming the manufacturer is using the same mold and not making two different lights. I chose to use a drill bit on its side to widen the slot on the Jeep as I did not have access to a dremel which would be the preferred tool. I donโt overly care about cutting the Jeep plastic as it looks to be replaceable if need be and itโs a Jeep. Donโt be afraid to have it not be perfect. Brightness is a dramatic increase over stock halogens. Iโm stationed in Puerto Rico for work and there are places with lack of lights and the roads are in horrible conditions some place. Iโm talking potholes 4-6 inches deep all over the place. Even big ones on the highway. This makes avoiding them that much easier. They did require some leveling as they were much too high upon install. Just a t15 torx to bring it down. I would recommend doing this before reinstalling the grill, while there is a little gap to change it with the grill on, I did not have a t handle style tool, and my bit/socket combo was too thick to fit. Wound up purchasing a $3 foldable torx set to deal with it. I havenโt gotten around to changing the fogs as Iโm waiting to purchase a new bumper and do both projects at once. Overall good buy for the price. Will have to see how they hold up over time but for the price seems like a good buy.
J**S
Dont waste your time. Lights are not bright, not even close
Well, after reading the reviews I decided to take a chance even with the reported problems with loose fog lights. I'm not very happy... Driver side fog light is loose even though it is secured very well inside bumper but, first things first. I connected fog light every which way over and over on my 2016 wrangler and nothing. So I tried my stock again to make sure I just didn't blow a fuse and it worked perfectly. So before j just threw them in the trash I reversed the wires black with red on both lights and they came on. It took me about 2 hours of messing with them and researching on YouTube but still have a loose fog light and with the type of lift I have theres only 1 way to remove them by taking the grill back off and I'm not doing it I will just drive with them the way it is. Headlights, I ordered this set because of everyone bragging about how bright they are and the pictures posted definitely are not from these headlights. They are not bright, the brights aren't even that bright either. If they didn't look so good on the jeep with the new grill and the trouble it is for the fog lights to be removed I would return them for sure. Either I was scammed or the headlights I received was defective. I think some of the reviews received free lights or a discount to be falsely advertised. People, take my advice unless you're easily satisfied and dont waste your money. If you dont drive in the country like I do then you might be ok but still the light is very choppy anyways. I still cant believe the pics they advertise for these headlights what a joke... UPDATE 06/16/2019 Decided to keep the lights since I didn't want a ticket, 1 of my oem headlights to a fall on concrete. Anyways I've used the fog lights several times and what appears to be hyperflash on my 16 jku ended up not being the case. I installed load resistors with factory plugs and bam, still fluttering. I really wouldn't call it hyper flash it's not it's like a slow flutter but very noticeable. I'm so dissatisfied and disappointed for not returning when I had the chance. The little bit of money you save isn't worth the embarrassment and hassle. Buy quality
K**C
Good value for a JK Wrangler, minor modifications to install
The LX lights are a good value. Sturdy made metal housing on head light and good platstic housing on fog lights. They provide a great bright light upgrade to factor lights. Required cables for headlight and fog lights made install quick with these plug in adaptors.I did have to modify the rear of the head light housing with a dremel. There are three retangular bosses on the rear housing to align it with the internal plastic factory rear ring. One of the 3 bosses had to cut off 1/2 of it as it did not align to ring recess. Likely as these are for TJ and JK use. I assume they are built to go into a TJ rear ring. That took 2 minutes each so not a big deal.Front rings fit perfect on head lights and fog ligths screwed right to factor bumper. Although the tilt adjustment screw is on the opposite of the lights from factory. So I had to drill 2 holes into the factor metal bumper support to allow for a screw driver for adjusting these.
J**Z
Excelente remplazo de faros
Excelente producto, le quedรณ de maravilla a una Jeep JK Sport 2014
J**U
Very bright LED light! Fast shipping, well-made product! See my review down below
Short review: Very good and well-made light, need another kit to have it work for hi and low beam(kit in info and picture). Also need a little rubbing with a knife on rhe passenger headlight socket/seat for the light to have the LED fit perfectly. Got it install since a week, travel at night on highway, amazing light beam! Should Have it done the LED swap way before! I recommended this product but with the Lumen Xenon HID Harness kit #SLDHH13 Long review: I was thinking since a long time to swap my head light and fog light on my 2007 Jeep JK Wrangler. I was looking around and stop on this package and reasonable price. Previous comment was hit and miss, I give it a try and I will see from myself. Installed head light first, pretty easy, installed with the anti-flicker cable who came with the package. Went for a test drive, passenger hi beam stop work, but low beam work... Swap the headlight with the driver side, did the same thing, intermittent on and off hi beam. I started to look on internet for that specify issue, it came as alot of Jeep Jk ower have this issue. Seem to be something with the high voltage relay from the jeep or something like that. I send an email to lx-light, they respond quickly saying that a issue with โ07 Jeep and need some cable H13 resistor. They provided me with an US amazon link and discontinued product in Canada... I phone my local offroad equipment dealer and talked about my issue, he said they were alway installing a Lumens Xenon HID harness kit #SLDHH13 for the flicker lights and the low-hi beam problem. Got the Lumens kit at my local store for around $50 CDN. Well-made harness kit, easy to install and after installed the Lumens kit on the LED light, no more hi beam issue!!! I drove more than a week in night with them and the brightness of the light is amazing! Not to bright, but now I have something to see in night! Installed the fog light, lretty muxh plug-n-play, no issue at all, quick and easy installation. Work like a charm also! (Seem to have no problem with the LED foglights on those Jeep). I recommend this product, but with the Lumens harness kit if you have a 2007 and up Jeep Jk. I put some before and after picture, hightway picture and the Lumens kit. Enjoys!!!
R**D
Exact as described
Fitted perfectly
T**Y
These are a left and right headlight
UPDATE after 8 years installed. This lights are still working great. Never a flicker or outage. Best lights on the market. Passenger side did not fit the factory slots perfectly but easy to fix. I bout these as a cheap alternative to the expensive JB Speaker light I have in my main Jeep. I am very impressed with these. They have a very distinctive cutoff so you don't blind oncoming traffic. They are very impressive for the price. I would definitely recommend.
L**O
Buenos faros y a buen precio
Llego bien y funcionando al 100 (y), saludos desde Veracruz, Mรฉxico, gracias
Trustpilot
3 weeks ago
2 months ago