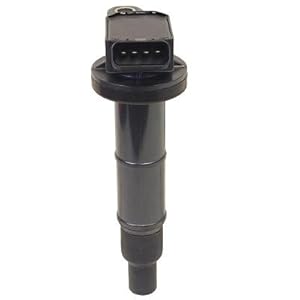
Desertcart purchases this item on your behalf and handles shipping, customs, and support to Indonesia.
⚡ Ignite your drive with precision power and sleek efficiency!
The Denso 673-1309 Direct Ignition Coil is a vehicle-specific, coil-on-plug replacement part engineered for select Lexus, Toyota, and Scion models. Featuring Denso’s pioneering compact stick-type design and micro-sized driver circuits, it delivers consistent high-energy ignition for improved fuel efficiency and reduced emissions. Lightweight and easy to install, this coil is trusted worldwide for reliability and performance, backed by thousands of positive reviews.



| ASIN | B002Y35O8O |
| Automotive Fit Type | Vehicle Specific Fit |
| Best Sellers Rank | #135,201 in Automotive ( See Top 100 in Automotive ) #386 in Automotive Replacement Ignition Coils |
| Brand | Denso |
| Brand Name | Denso |
| Compatible with Vehicle Type | Car, Truck |
| Connector Gender | Female |
| Customer Reviews | 4.7 out of 5 stars 1,313 Reviews |
| Global Trade Identification Number | 00042511173422 |
| Included Components | Direct Ignition Coil |
| Installation Type | coil-on-plug |
| Item Dimensions | 8.13 x 3.13 x 3.13 inches |
| Item Type Name | Direct Ignition Coil |
| Item Weight | 0.26 kg |
| Item dimensions L x W x H | 8.13 x 3.13 x 3.13 inches |
| Manufacturer | Denso |
| Manufacturer Part Number | 673-1309 |
| Manufacturer Warranty Description | 30 Days |
| Model Number | 673-1309 |
| Number of Items | 1 |
| OEM Equivalent Part Number | 673-1309 |
| Part Interchange Info | 673-1309 |
| UPC | 042511173422 |
| Unit Count | 1 Count |
| Vehicle Service Type | Car, Truck |
M**.
BEST COILS IVE EVER HAD!
Bought these for my 2008 Lexus IS 250 and my car runs and feels like new.
C**O
Excellent - perfect fit - easy installation for 2008 Sienna
2008 Sienna - Denso 673-1309 Ignition Coil - Excellent Replacement. Got dash indicators VSC, Trac Off, Check Engine, and using my OBDII code reader found OBDII error code P0356. Indicates this is a malfunction code for the #6 ignition coil/igniter assembly which is Bank 2, cylinder #6. Cleared the codes but it came right back. Luckily this is the cylinder bank next to the radiator with #6 on the end closest to the battery. Popped the engine cover off by pulling up on both sides of the cover. Removed the connector plug from the #6 ignition coil and removed the 10mm retainer bolt for #6. Swapped out the Denso 673-1309 Ignition Coil and tightened the 10mm retaining bolt. Reattached the connector plug, started engine, cleared codes with my code reader and the code did not come back. Replaced engine cover. All better now. always opt for Denso. Pay a little more for Denso, but very reliable and still save 60% with Amazon pricing compared to parts store.
N**S
great price for OEM coils
best price available for a toyota denso coil. autozone wanted $120 per coil, i got this one for just under $50. it seems to be authentic, and went in with no problems. cleared my check engine light code p0354 and car is now running great again. should last a long time compared to the aftermarket coils
A**.
Work Great
Worked perfectly in a 2006 Avalon 3.5L. Last like oem original parts. Don’t get the super-cheap. These work great. Will buy again when needed.
T**E
In order to do it easily, I highly recommend removing 1) windshield wipers and ...
I had multiple misfires on a 170k Lexus rx350. I wasn’t about to replace two or three and have to do it again. If you don’t plan to do it yourself, don’t read any further. Just know that the products are high quality and I wouldn’t get those $88 for 6 coil deals. What’s needed. Bud light is most important. Ngk plugs at $8 a piece. No gaskets or seals need replacing. 10mm, 12mm, 14mm, Spark plug remover, Allen key. 2”, 6” extensions and ratchet of choice. That’s all that I remember. This was such a major pita to change out. In order to do it easily, I highly recommend removing 1) windshield wipers and the metal tray spanning from coil over to coil over. 14mm, 3 each side for the tray. 10mm to remove the tray and the windshield motor. Windshield arms are held on by 3 14mm nuts. Careful with the windshield wiper removal. 2) remove the 4 10mm bolts off the intake thingy that’s bolted to the intake plenum. Don’t remove any hoses on the aluminum thingy. I think it’s called the map? Has the aluminum flapper that controls air entering your cylinders when you hit the gas. 3) remove the intake plenum itself. This was what made it o so much fun! There’s two 12mm bracket bolts In the back. The one on the passenger side is the one that makes you hate working on Japanese cars yet love it for its reliability b/c you know you’ll only do it once in your lifetime before you sell it (in my case, I’m not selling lol). The passenger side, remove the 12mm bolt on the bracket that’s on the block (it’s attached to block and intake plenum). Driver side, remove the bolt on the bracket bolted onto the intake plenum. I remember removing three vacuum Hoses. If it’s a soft hose it’s a vacuum hose. You’ll know what I mean. Remove what’s necessary. Take a rubber mallet and rock it’s world till it comes loose. Rock it forward and cover up the intake holes b/c if a bolt falls in, you’re going to need to give away the car a this point. Make sure you have 12” zip ties. If you don’t have it, have two 6” zip ties to make one zip ties. These will be used to hold the harness onto the coil/plug harness. Remove and do one cylinder at a time. This means changing out the plugs. All my plugs were almost bridging and way out of spec (0.050+). Each harness you remove, it will crack the retaining plastic piece. So use them zip ties I mentioned. Reinstall is the reversal of the removal. Did I torque everything down to spec? No I didn’t. It’s not like it’s my diesel where certain things need specific torque settings. Wish ford would build my diesel like my Lexus lol. Who ITH uses 7mm, 8mm, 11mm all in a mixed bag??? You should really have a professional do this - I’m just a treeshade mechanic that likes to save mine. I’m also cheap too. Anyways cheers folks!
A**O
Se tardó en llegar, veré cómo funciona
Tarde en dar la reseña, por esperar su instalación. Compré estás bobinas para Toyota sienna año 2007 y se ven muy bien hechas. Fueron instaladas y se siente muy bien mi vehículo. Al cabo de dos semanas usándolo,me volvió a encender la luz de motor . Espero que cuando lo escaneo, no sea falló de bobinas. Si lo es, pues estaré desepcionado, porque la desmantelación es trabajosa para Toyota sienna, no es fácil. También el vendedor no tuvo comunicación y se tardó llegar el producto.
M**.
Reliable and Trusted Quality from an OEM Manufacturer: Denso
Can’t prove the performance over the stock Toyota Ignition Coil but since this is the same brand used on The Toyota Assembly Line you know the aftermarket version will be as reliable if not better and I can be rest assured I will easily go another 120,000 miles before having to the replace this coil if not longer! Worth the extra money to put in a part that is not readily easy to access on the rear of this transverse engine on my 2007 Toyota Camry 3.5L V6.
P**H
Good quality
Exactly the right part
A**M
غير مطابق للصور والوصف
المنتج مش مطابق المواصفات
N**N
OEM greatness
Works as intended
M**.
Bobina Denso
Es un producto muy bueno pero no era el adecuado para mi vehículo, o entrega fue rápida, bien empaquetado y la devolución de llevo a cabo sin problemas al igual que el reembolso. Se está buscando la pieza compatible para comprar, recomendado usar Denso
H**Y
Can be hard to install on Sienna rear.
If you are trying to install this on rear cylinders of a Sienna (mine was an 08), it is quite possible to do in a driveway in an hour or two. After removing the wiper arm tray and upper intake box and intake pipe. The upper manifold needs to be removed, so new upper manifold and throttle body gaskets should be changed (get some new ones). There are two bolts and brackets holding the manifold from the back, the left one can be very hard to remove and reattach after. There is a wiring harness that is bolted in the way of the coils that can be unbolted and pushed aside enough to get the coils out. It is a good time to check spark plug gap or put new NGK or Denso spark plugs at the time you open this area. (You might want to get spark plugs). Also a good idea to put a little bit of dielectric grease in the end of the new coil to promote contact to the plug, seal the contact area and help with removing the coil later. Before you start, double check the firing order to ensure you are changing the correct coil. It is easy to confuse this when getting the code. The rear (according to code lettering) is actually A, C, E, and the front is B, D, F. So save yourself the trouble and make sure you have a code P0351, P0353 or P0355 for the rear cylinders before going through the trouble of taking off the manifold to get to the rear coils. I just changed all of my coil packs and spark plugs, and put a new air filter from AEM and the engine now runs very strong, all of the power it ever had.
J**A
Excelente a un buen precio
Cumplio con los requerimientos
Trustpilot
4 days ago
1 month ago