


Buy anything from 5,000+ international stores. One checkout price. No surprise fees. Join 2M+ shoppers on Desertcart.
Desertcart purchases this item on your behalf and handles shipping, customs, and support to Indonesia.
💡 Bring your headlights back to life — see and be seen in style!
The 3M Headlight Lens Restoration System is a comprehensive DIY kit featuring multiple sanding discs and a rubbing compound, designed to remove heavy yellowing and haze from plastic headlights. Powered by drill-activated sanding, it restores clarity and brightness, enhancing nighttime visibility and vehicle aesthetics. Trusted by thousands with a 4.5-star rating, this kit offers a cost-effective, professional-grade solution to keep your headlights looking like new.


| ASIN | B001AIZ5HY |
| Best Sellers Rank | #1,968 in Automotive ( See Top 100 in Automotive ) #8 in Automotive Headlight Restoration Kits |
| Brand | 3M |
| Brand Name | 3M |
| Compatible Material | Plastic |
| Customer Reviews | 4.5 out of 5 stars 33,706 Reviews |
| Global Trade Identification Number | 00051131390089 |
| Grit Material | Aluminum Oxide |
| Grit Material Type | Aluminum Oxide |
| Grit Number | 500 |
| Grit Type | Medium |
| Included Components | 1 Pack |
| Item Diameter | 3 Inches |
| Item Dimensions | 6.14 x 4.51 x 0.84 inches |
| Item Type Name | Headlight Lens Restoration System |
| Item Weight | 4.64 ounces |
| Item dimensions L x W x H | 6.14 x 4.51 x 0.84 inches |
| Manufacturer | 3M |
| Material | Plastic |
| Material Type | Plastic |
| Model | 39008 |
| Number of Items | 1 |
| Part Number | 39008 |
| Set Name | 3M Headlight Lens Restoration Kit |
| UPC | 051131390089 |
| Unit Count | 1.0 Count |
| Warranty Description | 1 year manufacturer warranty |
B**.
Exceeded expectations - great product
It took me awhile to get around to using this, but I finally got it done last weekend. This exceeded my expectations. Took me about 40 minutes to do both headlights on my SUV. Final results are excellent. They look brand new, bright and crystal clear. I had my doubts as I was doing it, but sure enough in the final step they buffed out clear. It has been a week since I completed it, so I can't comment on how they hold up over time, but I can't see why they wouldn't. The lenses on my SUV were half fogged up, mainly the upper half that gets exposed to the sun, so they weren't horrible from the start. But the headlight lenses are over 13 years old. The SUV has 220,000 miles on it, so I didn't feel like buying a whole new headlight housing. The housings are actually pretty cheap ($40 each if I recall), but sometimes the installation of the housing is a pain in the butt if you can't easily access every bolt. Thus, I wanted to give this a try. In this kit they give you multiple disks of the 500 and 800 grit. Then one of 3000 and one buffer pad. I only used one of the 500 and 800, which did both headlights. I wiped off the lens and pad every couple minutes to avoid build-up. I also didn't go full speed with the drill to avoid having the plastic head up (maybe half speed). I bet there's enough disks left over to do another 5 sets of headlights. So I wouldn't worry about running out. I used my electric drill at home, which didn't even use up a full charge on the battery. I took my time, mostly to be careful. The instructions say to go over the lens 6-8 times with each grit paper, but I bet I only did 4. Seemed like plenty. Also, it recommends to put masking tape around the molding surrounding the light to protect it. I put two layers and due to being sloppy I went off the lens and hit the tape. It sanded right through it and put a small scratch in the molding. After that I put a layer of duck tape on top of the masking tape. It was much more durable and didn't lead to any more scratches. It was so easy and the results so go, I'll probably go do my mother's car for her. Her car is newer than mine, yet for some reason more fogged up than my own.
K**J
Illuminate the Road Ahead
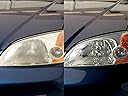
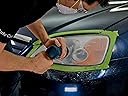
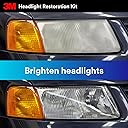
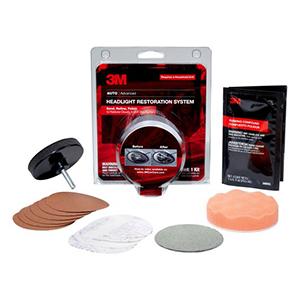
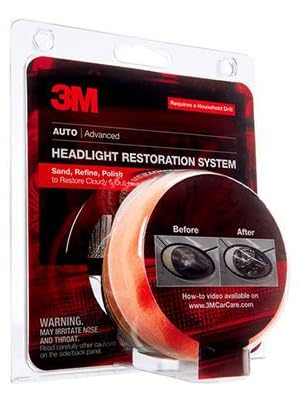
Rediscover the clarity and brightness of your vehicle's headlights with the 3M Headlight Lens Restoration System, a revolutionary solution for restoring cloudy, yellowed, or oxidized headlight lenses to like-new condition. Engineered with advanced technology and easy-to-use components, this restoration system eliminates the need for costly replacements and ensures improved visibility and safety on the road. Say goodbye to dull, hazy headlights and hello to crystal-clear illumination with the 3M Headlight Lens Restoration System. Restore Clarity and Brightness: The standout feature of the 3M Headlight Lens Restoration System is its ability to effectively remove yellowing, oxidation, and surface damage from headlight lenses, restoring them to their original clarity and brightness. Whether your headlights are clouded with age or damaged by UV exposure, this restoration system rejuvenates them, improving light output and enhancing visibility for safer nighttime driving. With its professional-grade results, the 3M System ensures that your headlights look and perform like new, without the hassle of replacement. Easy-to-Use Process: Designed for DIY enthusiasts and professional detailers alike, the 3M Headlight Lens Restoration System features a straightforward and user-friendly process that delivers professional-grade results with minimal effort. The system includes all the necessary components, including sanding discs, polishing pads, and finishing compound, as well as easy-to-follow instructions that guide you through each step of the restoration process. Simply attach the components to a household drill or rotary tool, follow the step-by-step instructions, and watch as your headlights are transformed from dull and hazy to clear and bright in no time. Long-Lasting Results: Unlike temporary solutions such as headlight cleaning kits or sprays, the results of the 3M Headlight Lens Restoration System are long-lasting and durable, providing years of improved visibility and safety on the road. By removing surface damage and restoring the integrity of the headlight lenses, this restoration system ensures that your headlights maintain their clarity and brightness over time, even in harsh weather conditions or high-UV environments. With its professional-grade durability, the 3M System offers peace of mind knowing that your headlights will remain clear and bright for years to come. Cost-Effective Solution: Save time and money on costly headlight replacements with the 3M Headlight Lens Restoration System, a cost-effective solution that delivers professional-grade results at a fraction of the cost. By restoring your existing headlights rather than replacing them, you can avoid expensive dealership fees and aftermarket parts, allowing you to enjoy like-new clarity and brightness without breaking the bank. Whether you're restoring a single vehicle or a fleet of vehicles, the 3M System offers unbeatable value and convenience for all your headlight restoration needs. Enhanced Safety and Visibility: In addition to improving the appearance of your vehicle, the 3M Headlight Lens Restoration System enhances safety and visibility on the road, reducing the risk of accidents and collisions caused by dim or hazy headlights. By restoring the clarity and brightness of your headlights, this restoration system improves light output and beam pattern, allowing you to see and be seen more clearly in low-light conditions, inclement weather, and nighttime driving. With its focus on safety and visibility, the 3M System helps you drive with confidence, knowing that your headlights are performing at their best. The 3M Headlight Lens Restoration System is a game-changer for vehicle owners seeking to restore the clarity, brightness, and safety of their headlights. With its professional-grade results, easy-to-use process, long-lasting durability, cost-effective solution, and enhanced safety features, this restoration system offers unbeatable value and convenience for all your headlight restoration needs. Upgrade to the 3M System today and experience the difference of crystal-clear illumination on the road ahead.
M**S
Good DIY Headlight Restoration Kit That Brings Back Clarity
This headlight restoration system is a well-known DIY kit that does a solid job of removing oxidation, yellowing, and haze from cloudy headlights. It uses a step-by-step sanding and polishing process that gradually restores clarity, and when used properly, it can noticeably improve brightness and overall appearance without needing full headlight replacement. The drill-based process helps speed things up and gives consistent results when you follow the steps carefully. In real use, it tends to work best on moderately oxidized headlights and can make a big difference in visibility at night. It does require a bit of effort and patience, especially during the sanding stages, but the results are usually worth it when done correctly. Overall, it’s a reliable, cost-effective way to refresh dull headlights and extend their usable life.
X**O
Works like magic
Awesome product. It cleared up the yellowing perfectly and the lights are much brighter and clearer now. Highly recommend.
H**K
The most effective kit I've used to clarify cloudy headlights
Oil, filter and tire changes are taken for granted as periodic maintenance necessities. Others, as wiper blade replacement, are more often neglected until their declining function forces attention. But your dimming headlights are such a gradual process that it's easy to go completely unaddressed though degraded lighting poses a real safety threat. The clear plastic covering the headlights is exposed to chemicals splashed up from the road surface and acid rain which is constantly baked on by the intense heat of modern bulbs. Oxidation happens until it looks like it's wrapped in wax paper and your headlight beams are severely compromised. This kit and 20 to 30 minutes of your time can render those lenses crystal clear and looking like new. The instructions note that you will need to have access to an electric or battery powered drill. The kit comes with a disc pad holder that fits into the drill. Small circular sandpaper discs are attached to the pad via a velcro-like backing. There are supplied several discs of 500 grit, 800 grit, a "trizak" disc for further polishing, a foam pad and and a small amount of polish/rubbing compound cream. Before beginning work, the area around the headlight needs to be protected with recommended masking tape. 3M Kits I'd purchased in the past included this tape, but this particular kit does not. (Kit #39014 also sold on Amazon includes 25' of tape but costs about $7 more. If you already have suitable masking tape from a painting project you can save a few dollars with this kit though.) I used blue masking tape found in big box home supply stores in the painting section. Two layers are recommended to assure no damage happens to the adjacent car body paint surrounding your headlights. Once taped, the lens should be washed with soap and water to remove any dirt. Attach the first disc and with light to medium pressure go over the entire lens, making certain not to stay in one spot too long which would heat and damage the plastic. You might feel some uncertainty and wonder if you're destroying your lenses because they become a milky white. Be certain to periodically pat the disc to remove any residue dust buildup. When you have a consistent surface, move on to the next finer grit, the white 800 disc. This refines the surface though still an opaque white. The lens should be wet with a spray bottle or damp cloth and kept wet while using the Trizak disc. Finally use the foam pad attachment with dime sized amounts of the polishing cream. It's best to put the cream at the center of the disc and then slide it around the lens before you turn on the drill to have an even distribution and less spatter. If you don't rush through the process and do each step completely, you should now have headlights that look completely new. I've used perhaps 5 of these kits over time and the results are consistently amazing. There are kits that are easier to use with only fluids you apply by hand and elbow grease. They work ok, depending on the degree of residue and oxidation you have to remove. But if you want a professional looking restoration and you have a little patience, this kit provides outstanding results. Just be certain to purchase the necessary masking tape and try not to rush through the process.
A**R
Disc pad holder velcro is stronger than its adhesive
It's difficult to separate the buffing pad from the disc pad holder's velcro because the velcro's adhesive backing separates first. Some tips for you: 3m directions say go by sight to gauge the scratches but I suggest go by feel as well. There were times during the steps when the headlight had a uniform appearance but going over it with the tips of my fingers I could tell some areas were different. Before moving on to the next step I went over those areas until there was a consistency. 3m directions say 1200-1600rpm drill. I used a corded drill that can go much faster than that but set it to 1200 to 1600 rpm which really isn't as fast as you'd think. I used a tachometer to occasionally gauge the disc holder speed and I was surprised by how much restraint I needed on the trigger to get to that speed. Also my drill has a set button so my finger doesn't need to remain on the trigger. Despite that as the power changes in the house (like the AC comes on or whatever) it alters the speed somewhat. You don't need a tachometer or a lock button, though it does make it easier. Just try to take it easy or you could smudge the plastic. I suggest use at least two layers of blue painter's tape because I used just one and in some areas it wore away. There is not enough buffing compound for four headlights if you need to buff a headlight multiple times (they don't always look totally clear the first time) and you may run out like I did. I used some Meguiar's PlastX compound when I ran out. The final step was basically buff, windex, buff, windex, repeat, until totally clear. Overall though it's a good kit. I fixed four badly discolored headlights with the one kit (and the PlastX) and they all came out clear. Each set of headlights took me several hours but that may be because they were in really bad shape. After that I applied Meguiar's Keep Clear Headlight Coating (which took more than 24 hours to completely dry so keep that in mind if you're going to use it). The last time I did this was many years ago and the headlights stayed clear for a few years.
L**Z
Good light restoration kit for everyday use
Super helpful for fixing headlights before a night drive. i used it on my car's faded lenses, and the difference was quite clear. the process was straightforward, and i appreciated how quickly it worked. felt glad to save some cash doing it myself instead of replacing the lenses. 😊 overall, a handy product for anyone wanting clearer headlights.
A**G
Make your headlights look like new!
This kit truly works wonders if you have headlights that are in need of a restoration of any kind. My headlights weren't so much sun faded as they were riddled with scratches and rock pits. This kit made them look new. I would highly recommend taking the time to clear coat your headlights after using this 3M kit. You can use the UV protection polish they recommend, but it really will not stand the test of time. You will have to continuously apply it and will more than likely have to go through this process again anyway. I will go over my method in this review which should be a more permanent solution for the sun fading problem. My plan is to post the picture in the order I did the job. From before to after. Quick Tips/Advice: I will post plenty of pictures so you can see the process thoroughly. You do not have to be a professional painter to do this. You can choose to remove your headlights or leave them on. I left mine on and had perfectly fine results. Just make sure that you thoroughly mask your car first if you leave your headlights on. Another bit of advice, take your time, don't freak out. I was worried at first too, mostly because just one of my headlights is $500 to replace if I mess up. It will look like you ruined your headlights literally until you finish the last step of the process. So again, don't freak out. I used plain masking tape. It was cheap and works just as well as the 3M tape suggested for use. Save your hands, use the a drill. My headlights have plenty of curves and tight places. Used the drill for the majority of the job. Get the tight spots with by hand. It will save you time as well as your hands. I probably spent about 2 hours per headlight after including my extra clear coat step. My Steps: Follow the 3M instructions all the way until you are finished with the polishing part. This is where I decided to buy some UV protective clear coat. I used the clear coat in the following link but was able to find it at Wal-Mart for $3 and change. Rust-Oleum 249117 Painter's Touch Multi Purpose Spray Paint, 12-Ounce, Clear . Before you clear coat the headlights. Cover your car thoroughly. I used newspapers. If you do not cover your car, odds are that you will get overspray all over you car and you will have to buff it all out. So save yourself the trouble and cover your car up nicely. For results like mine, follow the instructions on the can. Spray 6 coats starting light, but making the coats a little heavier for the last 2 coats. You will probably get a hair, or dust, or other imperfections in the clear coat. DO NOT TRY TO TAKE ANY OF IT OUT WHILE CLEAR IS WET! Relax, leave it be, let it dry, I promise it will be resolved later! I even had some newspaper get blown onto my headlight leaving little creases and annoying pits. Just keep adding clear coat until you are done with all 6 coats. This is the hard part. WAIT. Wait for the clear coat to fully cure before moving on. If you don't, it will get messed up and you will have way more work to do than you need to. I waited 5 days with 50-60 degree weather. You can sill driver your car, the clear dries to the touch in 20 minutes, and to handle in an hour. So you can drive your car for the next 5 days. Now that you have waited, you can finish up! I literally repeated the last two steps on the now cured clear coat to finish up. Literally wet sand it with the 3000 grit pad, and polish it up. I would take the time to clean and dry the headlight off periodically during the wet sanding process to see what looks done and what still needs work. This can include dust, orange peel, pits, cracks, runs, etc (I had a little bit of everything). Since you put 6 coats on, you should have a decent amount of room for this process. Still, be careful as to not sand too deep or you will have to start over.
T**K
Very satisfying.
So far so good. My car is 16 years old and this is the first time the lenses have been treated. My lenses have vastly improved, hopefully it lasts a reasonable time before having to reapply. It will take some effort from start to finish, but if you follow the instructions diligently, you’ll be well rewarded.
R**S
Top demais
Muito bom e chegou rápido. Recomendo.
S**E
Works great
The instructions are very clear and the product works very well. There is a learning curve and it will only be as good as the effort you are willing to put in. It is a little time consuming but it makes a huge difference. This is the first time in 7 years that I have restored the headlights and it made a big difference in clarity. The picture has the left headlight not done and the right one finished and you can tell the difference easily. I just kept my drill on speed 1 and controlling the sanding was really easy. When using the 3000grit pad use a lot of water and it does a great job making it almost clear, then the compound finished it up to almost like new. I am very pleased with this kit. I do wish it came with a sealing wax for when you finish but that’s not a big deal.
A**R
Like magic. Worth every penny.
This kit works extremely well and I was able to do 4 headlights with it. I wish I would have found this 2 years earlier than I did. HIGHLY recommended if your headlights embarrass you. Plenty of YouTube videos showing how to do it.
A**J
Excellent résultat
J’ai acheté le kit 3M 39008 de restoration d’optiques de phares et Le résultat est excellent. Les optiques de phares de ma voiture avaient mal vieillis, et après recherche, le kit 3M est apparu comme le meilleur produit. La seule différence est que j’ai commencé à poncer manuellement les optiques avec du papier de verre « carrossier » de grain 400 et à l’eau avant la procédure préconisée par 3M dans son tuto sur YouTube, astuce trouvée sur un forum. Le résultat est bluffant, les optiques paraissent neuves, ça rajeunit la voiture, j’y gagne en sécurité et je suis serein pour le contrôle technique. Le seule défaut que je note est l’absence du ruban adhésif de protection, qui doit être acheté à part.
Trustpilot
2 months ago
1 week ago